
TEIN USA will be closed on Monday May 31, 2010 in observance of Memorial Day.
Monthly Archives: May 2010
Super Lap Battle Exhibition in Vegas
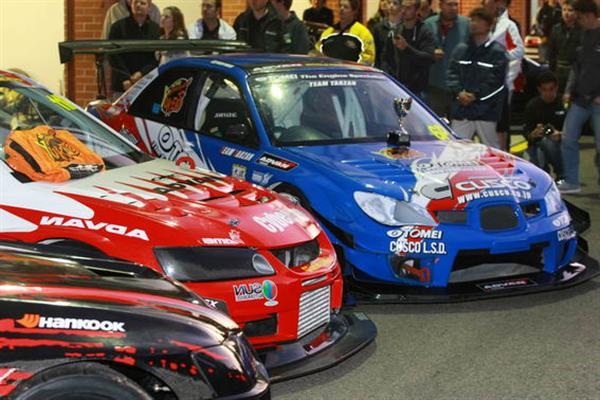
This past weekend I took a trip to Las Vegas, NV for Super Lap Battle exhibition race. Competitors included a couple of the top contenders from each class.
TEIN was well represented with 4 of the 9 cars running Super Racing coilovers. This was an invite only exhibition race held along with XDC drift and Remix car show. There were a good amount of drift competitors, spectators, show cars, and vendors during the one day event held at Las Vegas Motor Speedway. The 2.39 mile road course consisted of a good mix of high and low speed corners.
I was out there to support our sponsored vehicles and check out the action. TEIN sponsored vehicles included:

Crawford Performance STi in Unlimited AWD
")
Evasive Motorsports EVO 9 in Limited AWD
")
SportCar Motion Civic in Limited FF
")
and new comer Zenkai Motorsports STI in Street AWD
Each of the cars are using Super Racing Coilovers. Crawford and Evasive are both using custom valved setups with increased spring rates. SportCar Motion and Zenkai are using off the shelf kits with higher spring rates (spring rate based on vehicle setup and tire choice). With more testing and feedback we can revalve the off the shelf kits if needed which is a service made available to all TEIN users.
Race Report: World Time Attack Challange
This past weekend was the World Time Attack Challenge held at the Eastern Creek Raceway in Australia. Although this event was new to my ears, it is unquestionably not new to the racing industry with many of the industries top manufactures and drivers present.
The car that really caught our attention was the world famous TEIN sponsored Mitsubishi Cyber Evo 9 driven by Mr. Eiji “Tarzan” Yamada. The Cyber Evo currently uses a custom valved, Super Racing coilover kit and previously used our HT kit.
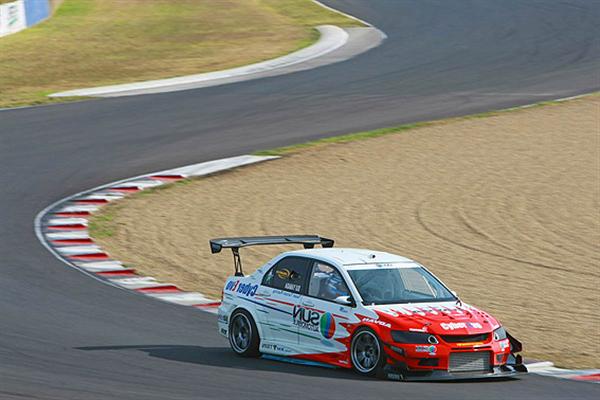

The Cyber Evo took home first overall with a lap time of 1:30.5870 (0:01.2970 seconds faster than 2nd place).
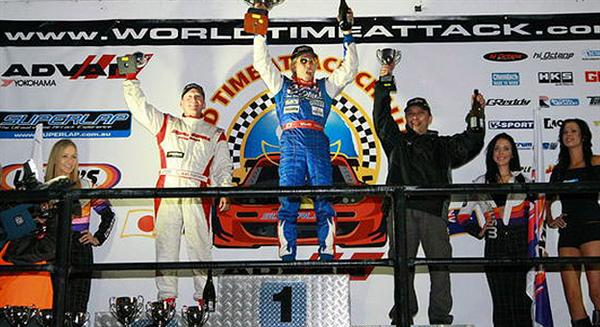
All photos from World Time Attack website.
2010 2.5 Subaru Legacy Lowering Springs
S.Tech Spring testing on the 2010 2.5 Subaru Legacy has been completed.
Expect the ride height drop to be: Front -45mm and Rear -40mm
The actual drop may vary by models due to the weight of different components (ie Transmission, Packages, etc.)
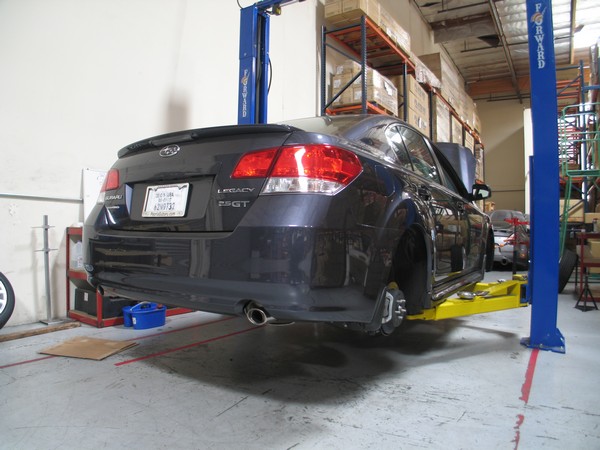
Expect Mass Production units to be ready for sale in about 4 months time.
We will be testing Lowering Springs on the 3.6 Legacy soon.
We will also be testing coilovers in the near future.
Oregon Trail Rally in a Scion xD
This past weekend I attended the Oregon Trail Rally as a crew member/ mechanic for the 0-60 Rally xD. This was my first rally ever and it was a eye opening experience.
Arrived in Portland on Thursday night for our first ever team meeting. This was the first time that the entire team was able to meet at one time. Going into this event everything was new: new unproven car, new transporter, new crew, new co-driver, etc…

On Friday we were at Portland International Raceway for the entire day. For the first half we were setting up the car and making changes so that we could pass tech inspection. My job was to fabricate rear rubber guards to protect the suspension, brakes, and shocks (little did I know that I would end up making about 5 sets of these throughout the weekend). Rally competition started around 7PM which were Special Stages designed for spectators.

Saturday had us in Dalles which is about 1.5hrs from Portland and then in Dufur for the second half of the day. We would stay in Dufur for the remainder of the Rally which ended Sunday afternoon.

There were basically four mechanics for the car which included Lenny and Ben from Design Craft, and Mr. Nakai and myself from TEIN. Gordon and the 0-60 crew were cleanup and kept the car clean for the entire Rally. Other crew members included photographers, videographers, and volunteers willing to help anywhere needed.
")
(picture is missing three crew members who were hiking back from the best photo spot – pickup 0-60 magazine to see the amazing photos)
During each day we had 1-2 services between the stages. This is when the cars come back into the service park for crew members to repair, clean, refuel, adjust the car. Most services are about 40mins which was enough time to:
Remove and inspect all 4 wheels, Rotate wheels, check all fluids, repair any damage, inspect and torque check all suspension components, inspect and clean brakes, clean the entire car inside and out, refuel and get the car back out.

Each service is organized chaos. It must look like a swarm of bees attacking from a spectator point of view. Any delays in service and the car is hit with time penalties. At the end of every service I was covered in dust/ dirt but I was glad the rain held off until the rally ended – mud would have REALLY made it messy.

At the end of every night we performed a longer more thorough service which added changing fluids, bleeding brakes and more extensive repairs. A Rally car has many components which preventative like the mud flaps, inner fender liners, underbody body guards, etc… During service these parts all need to be inspected, repaired or replaced to ensure nothing is damaged in the following stages.

Crewing for a rally car definitely has its stresses. While the car is out running you have no contact so you never know what is going on. Then when the car arrives it is a rush to get all service completed. Once the car leaves it is time to cleanup and prepared for the next service or grab a bite to eat. At the end of the day there is service and then teardown of the pit for the night. The next day it all starts over again.
The underpowered 1WD (due to open differential) almost all stock xD SHOCKED many teams and spectators alike with its quick times which were mainly due to driver Chris Duplessis (2007 & 2008 2WD Champion) and co-driver Ron Zaras (0-60 editor, 2nd Rally ever).

Driver, Chris with the helmet hair. Co-driver, Ron with the Sparco suit, and 0-60 girls.
The attrition rate of the rally was high with about half the field out or slowed due to damage. The durable and reliable Scion completed the entire Rally with no incident. Stock engine, stock transmission, stock brakes = no problems. Yes, more power, clutch type differential, upgraded brakes, shorter gears, etc… would all make the car faster but the goal for this first event was to finish. With the hard charging Duplessis behind the wheel the car was able to finish 2nd in 2WD, losing to a veteran turbo charged Ford Focus.
Visit 0-60 Magazine’s website for videos and a complete story of the event.
SuperPro Polyurethane Bushing Install
You may or may not know that TEIN is the exclusive US Distributor of SuperPro Polyurethane Bushings.
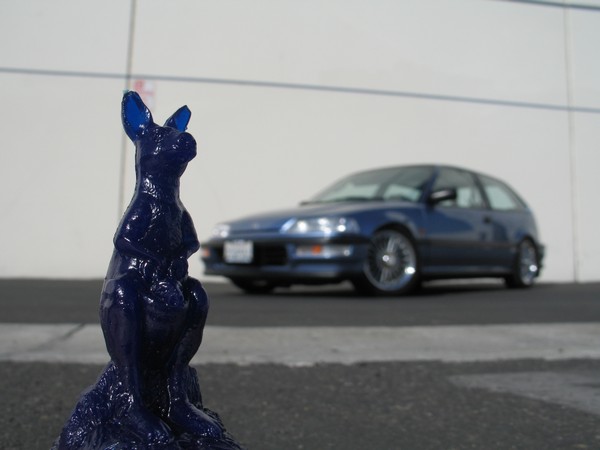
About a year ago we did a install of these bushings on a Honda Civic EF Hatch for Super Street magazine.
SuperPro bushings are sold by individual placements and by vehicle kits. This allows the buyer to purchase exactly what is desired if not an entire kit. Each package of bushings comes with bushings, grease packet, and inner tubes if needed. You can actually see what each part number comes with by going to the online catalog. Some kits require reusing steel shells or housings that is part of the OE bushing. This requires a bit of processing.
Although this may be a task that any novice is capable of doing, when in doubt, contact a reputable shop that can do this for you.
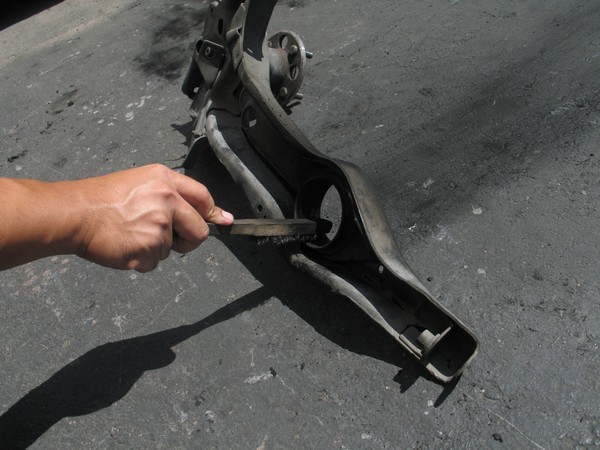
Depending on the type of bushings removal can be done with an acetylene torch or press.
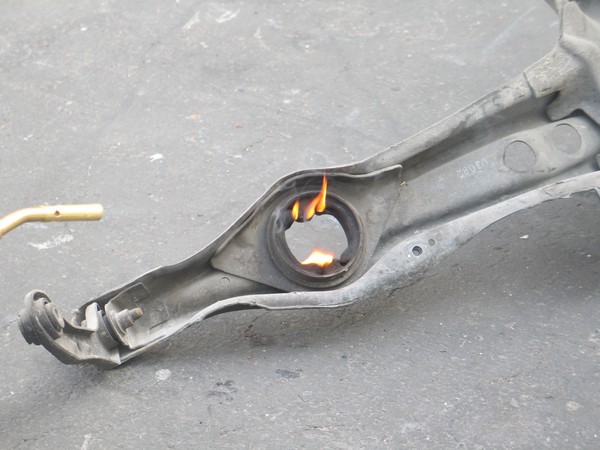
Removal by Acetylene Torch
First of all make sure you have all the proper equipment, and remember, safety is always top priority. First, you must apply heat evenly with a acetylene torch. You want to make sure to get heat on the top, bottom and the middle of where the bushing will be coming out from.
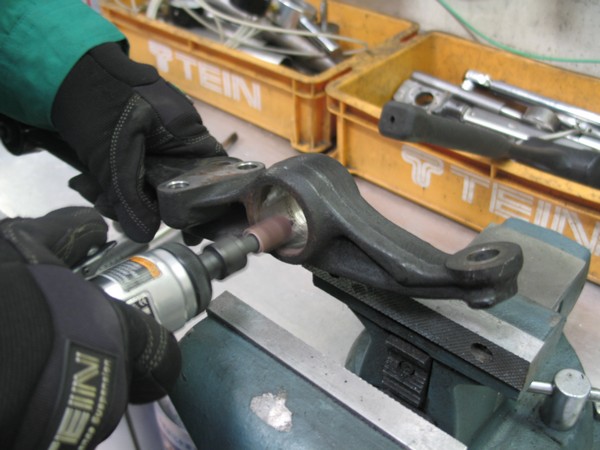
Removal by Hydraulic or Arbor Press
Hydraulic press with dies on top and bottom. Not a lot of force is needed. You may hear a pop when the bushing shell initially breaks it bond with the arm.

Sometimes a little prep work will make pressing out the bushing a little easier especially if you cannot find a die that fits perfectly.

Clean Up
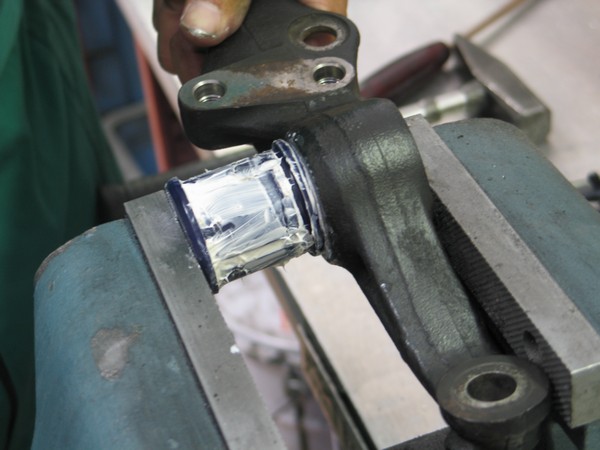
Once the bushing comes out please make sure that you grind down any excess material that is left on. You can use a heavy grit sand paper or a wire brush. Make sure that the inside is smooth so that there are no obstructions that may interfere when pressing in the new bushing. You can spray paint the part that you are replacing the bushing on to prevent any corrosion from happening to the part.
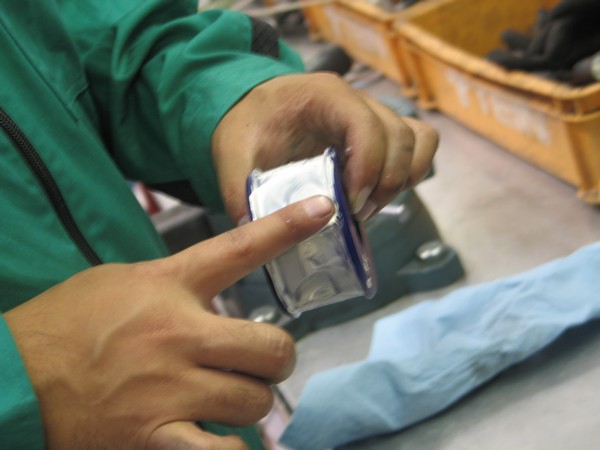
Installation of new Polyurethane Bushing and Inner Tube
Once the bushing is ready to be installed, you will need to apply grease thoroughly on the bushing and on the inside of the part that it will be installed on.
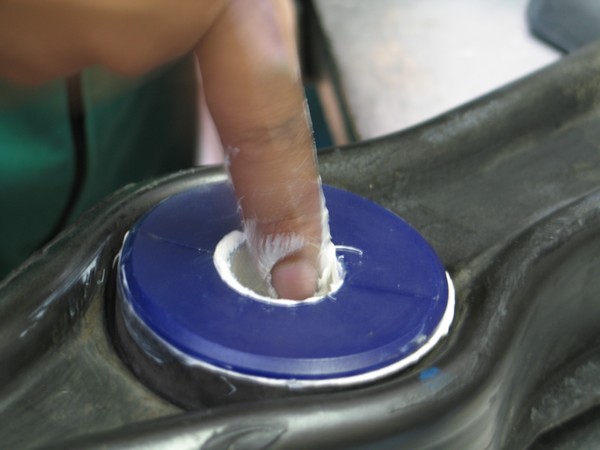
You can use a vise to press in the bushings and housing or also a bushing press kit that is offered through SuperPro.

Installation of arm back to vehicle
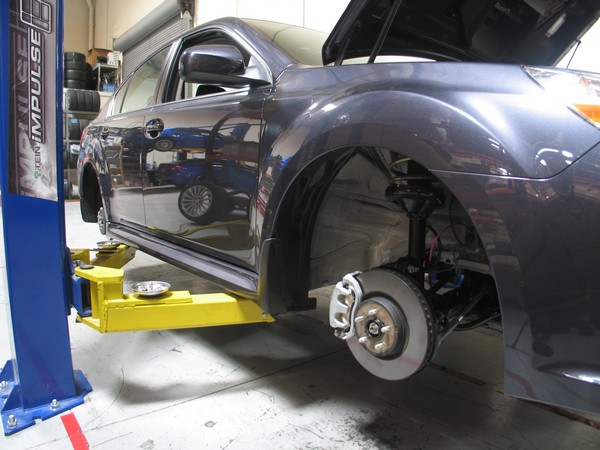
The last step will be to install the part that you changed the bushing on back on the car. Please note to torque down the bolts to its specific torque setting. Before tightening any bolts, it is recommended to preload the suspension to simulate a load similar to when the vehicle is on the ground(1g). Otherwise, tightening any bolts while the suspension is at full droop(fully extended) will put tension on the bushing causing it to wear out quicker, make noise while driving, as well as alter ride height. The picture below shows the left rear suspension at 1G, car is off the ground and the floor jack is being used to simulate ride height.

Removal video using acetylene torch.
You can also take a look at Fulcrum Suspension’s website for additional removal / installation videos through these links.
Pressing In with an Arbor Press
<object width=”480″ height=”385″><param name=”movie” value=”http://www.youtube.com/v/dqo43St5fu0&hl=en_US&fs=1&”></param><param name=”allowFullScreen” value=”true”></param><param name=”allowscriptaccess” value=”always”></param><embed src=”http://www.youtube.com/v/dqo43St5fu0&hl=en_US&fs=1&” type=”application/x-shockwave-flash” allowscriptaccess=”always” allowfullscreen=”true” width=”480″ height=”385″></embed></object>
Rally xD with Specialized HG Dampers
Just got back from Portland Oregon. Myself and Mr. Nakai went out to support 0-60 magazine rally entry for Rally America – Rd. 4 Rally Oregon. The three day event started Friday and ended Sunday afternoon.
Gordon T. of 0-60 had a Scion xD modified for Rally competition. It features custom TEIN HG dampers which are designed for rally usage.

The kit features external reservoirs, two-way adjustment, extra large piston shafts, and other internal parts made to handle the harsh conditions.

The team was quite large with many support personnel who are here to ensure this experiment is a success. This is the first time the car has been run. It was completed by Design Craft only a few days before the event and put on the trailer immediately after. The support team is comprised of Rally virgins besides Mr. Nakai who has supported rally worldwide for the past 3 years.

The car has a stock motor, stock transmission and no testing. Major modifications are the roll cage, HG dampers, Volks, and plethora of Sparco parts. The car was kept simple for a reason – so that it would finish.

I will post a more detailed account of the weekend in the days to come.
Here is a short video clip found on YouTube. Not bad considering the car is one wheel drive (open differential).
TEIN Damper Maintenance
Hey everyone, just here to give everyone tips on proper maintenance of your TEIN coilovers. Before that I just want to mention a couple Overhaul Customers who may have had a chance to read up on my previous post regarding the packing of dampers being sent in for repairs. Check out the pics below of the creative packing that did not go unnoticed.
Two thumbs up to Jason M. and Marshall J. for the unique and well packed repairs.
_________________________________________________________________________________________
A lot of folks seem to think that overall maintenance is not required for you coilovers but that is wrong. OE shocks and struts may not require maintenance since they do not have adjustable adjustable parts.
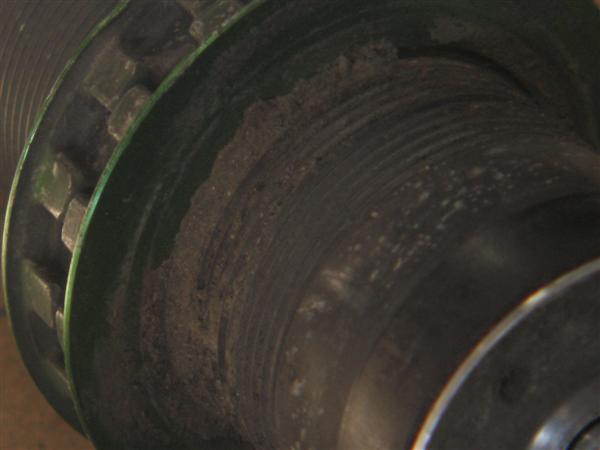
Overlooking the maintenance can cause issues with seized parts such as seat locks, lower adjusting brackets, pillowball mount bearing and casing, etc… Even though we use special coatings on various components it is still possible for debris and/or moisture to build up and cause serious damage.
Periodic maintenance of dampers and components can prevent many future issues such as thread damage, seized parts, rusting and blown seals. Regular maintenance will definitely save your high dollar investment and prolong product life.
Routine Maintenance while the units are still on the vehicle:
– Basic wipe down or dirt removal. Can be down with a plastic bristle brush, rags, compressed air, etc…
– Lubrication
Specific areas to clean are the threaded section, upper mounts and lower brackets.
At this time we also suggest a visual inspection of dust boot, mount bushings, spring seats, and bolts/ nuts.
Seasonal or annual major maintenance – with the dampers off the vehicle.
– Full dis-assembly of unit to clean and lube all parts.
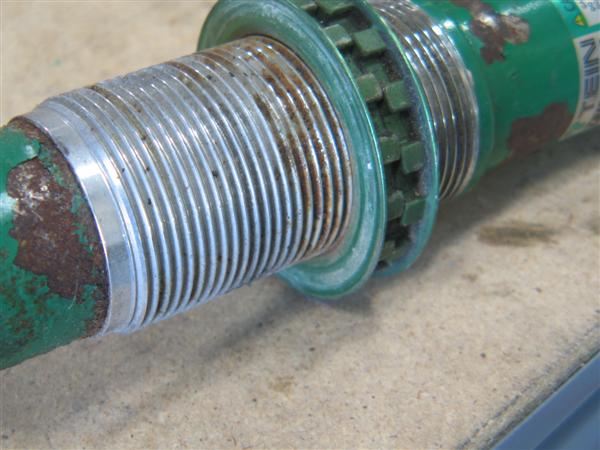
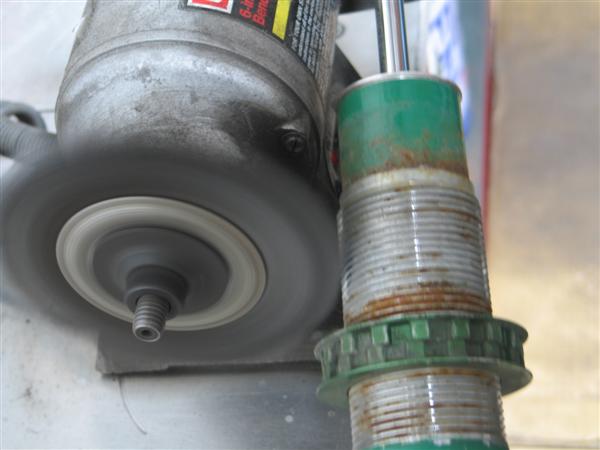
– If there is really stubborn debris or damage you can use a wire wheel brush*.
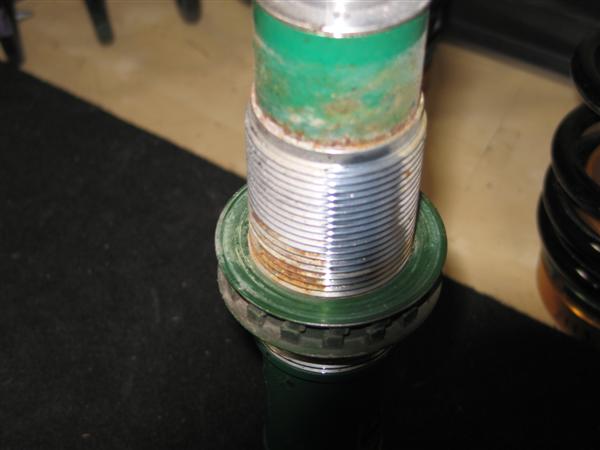
– If rust is found, the rust should be completely removed** and the effected areas repainted.
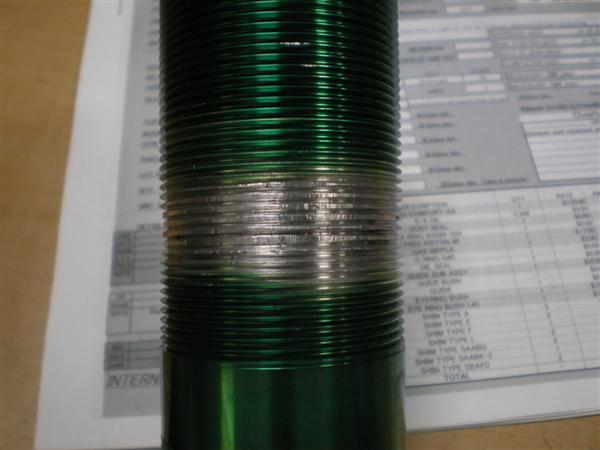
*When using a wire wheel do not put too much pressure as it could brush away the coating which would allow corrosion and rust to form easily. (The picture provided below demonstrate the removal of some oxidation and rust on the threaded sleeve portion. The seat locks should be removed when cleaning all damper conditions).
**Parts cleaner or any heavy duty de-greasers are not recommended as they could eat away at the powder coating, stripping the damper to bare metal, as well as erase the ink print on the stickers and maybe even remove some coating on the threaded body.
Lubrication
Lubrication should be applied to threaded sleeve, seat locks , and other parts.
For lubricant of choice, we use either a light film of Lithium Grease or a Rust Inhibitor.True the grease may attract more debris but it will keep a longer lasting barrier than some Rust Inhibitors. Just be sure to wipe off any overspray or excess grease to avoid any confusion thinking the dampers are leaking oil or build up of debris. For Pillowball Mounts the grease is the best choice as it would help decrease the bearing noise and provide protection against protection.
All in all keeping the dampers clean and lubed will save you from any expensive repairs, down time, and headaches.
Employee owned: EVO 9
This car has been in a few previous posts. It is owned by one of the staff here at TEIN USA. Originally bought brand new to be a fun daily driver / occasional track toy but soon took on a life of its own. Since we are the exclusive distributor for a variety of top brands (Carbing, Fujitsubo, Defi, SuperPro, and Takata) it was easy to build a quality car, plus employee discounts never hurt.

The exterior is comprised of Voltex bodykit and wing. Volk TE-37 18×9.5+12 with 8mm of spacers on front and rear wrapped with 275/35/18 tires.

Sitting on Super Racing coilovers with 14kg front springs and 12kg rear springs. The dampers have also been revalved with a few “special” parts to test out. Could be lower for appearance sake but this ride height works well for performance reasons.

Power is provided by Tomei ARMS turbo, Cosworth head and top end internals, plus a few HKS parts. You can find out HP/TQ and power curve in the current issue of Import Tuner magazine (July 2010) which go into detail about the Tomei Arms M7960 turbo, Cosworth 272 cams, and Okada Projects Quad Pac ignition coils. Drivetrain is comprised of Carbonetic carbon fiber clutch and carbon differentials.

Interior is filled with DEFI meters, Bride GIAS seats, Greddy boost controller, Alpine headunit, and of course dual EDFCs.

Having fun and testing at Willow Springs raceway in 2009.

2008 EVO vs STI Shootout at Buttonwillow raceway. Ran a 1:59 on config. CW13 with Rob Walker driving on Hankook RS-2 street tires.
")
Car on the cover of Modified magazine back in August 2008.
Photo credit for the action shot to Larry Chen at driftfotos.com
TEIN’s 2005 Ford Mustang GT
TEIN’s global involvement in producing aftermarket suspension goes well beyond the Japanese Domestic brands, such as Toyota, Nissan, Honda, etc. In 2003, we started developing suspensions for European and U.S. Domestic brands. Soon after, we started campaigning our line of suspensions for these markets and had demo cars, like the E46 BMW M3(on TEIN SS-P) and MkV GTI widebody(on TEIN Euro Damper). But, my favorite one to date would be the 2005 S197 Ford Mustang showcasing our TEIN Type Flex dampers.
Other than our Type Flex dampers as suspension modifications, some of my favorite modifications are ProCharger cetrifugal supercharger, custom 3″ exhaust by Fujitsubo, massive Wilwood 6 piston front and 2 piston rear big brake kit, a host of Defi Red Racer gauges, and the 19″x8.5″ front and 19″x9.5″ rear Volk GTF’s. The list of modifications goes well beyond those and definitely contribute to a very unique car build for the TEIN group.
Below are a few pics
")
Sparco seats, steering wheel and shift knob. Clarion DVD/ Navigation Double DIN, and of course DEFI Red Racer gauges.
") Polished Procharger kit along with polished piping. Exedy clutch and flywheel. 496WHP
Polished Procharger kit along with polished piping. Exedy clutch and flywheel. 496WHP
")
Wilwood 6 piston BBK kit.
")
JBA Longtube headers feeding custom Fujitsubo exhaust. BMR Fabrication subframe and front control arms.
") Torsen Differential, more BMR suspension links and chassis bracing.
Torsen Differential, more BMR suspension links and chassis bracing.
")