For anyone with factory equipped Adaptive or Electronically Controlled Suspension will know, changing to an aftermarket suspension kit (i.e. coilovers) isn’t typically a straightforward, or plug & play affair. Now, some suspension manufacturers will at least include some method of resolving any warnings or errors that may pop up on the instrument panel whenever disconnecting the OEM Adaptive/Electronic suspension. In some cases, it’s not a problem at all.
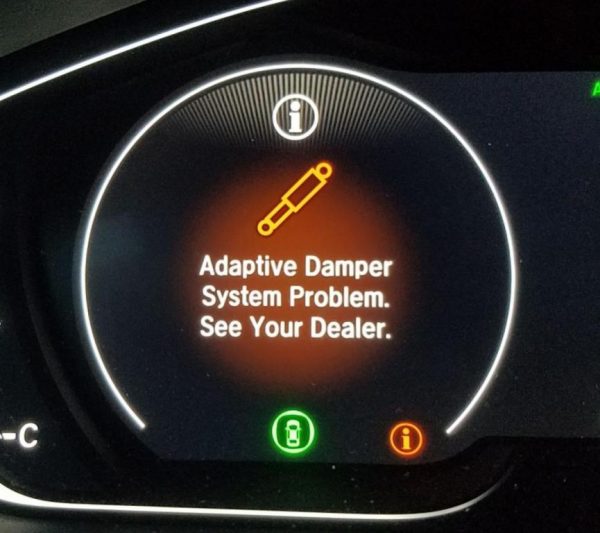
This is the error notification you’ll get on the late-model Honda Accord Touring models with Adaptive Suspension.
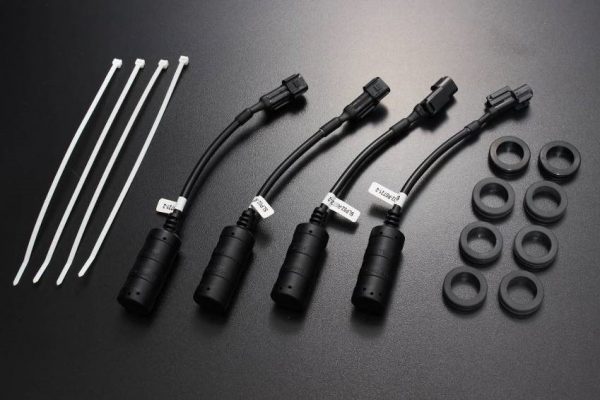
Over a two years ago, we decided that we had to do something similar, as factory Adaptive/Electronic suspension is becoming standard on entry-level priced cars. No longer is this type of suspension exclusive to luxury marques. This led to the development of our Error Canceller Kits.
Error Canceller Kit show with some accessories, but actual accessories may vary by vehicle application.
Again, with entry-level cars now having either standard or optional (trim level dependant) Adaptive/Electronic suspension, there’s always a need for better handling performance. So, we had to come up with some type of resolution to the aforementioned warning or error on the dash.
Our solution is literally plug & play. Each Error Canceller unit uses a OEM style plug that connects to the factory wiring harness for the suspension. All that’s left is to mount the canceller securely to the damper, and you’ll be good to go!
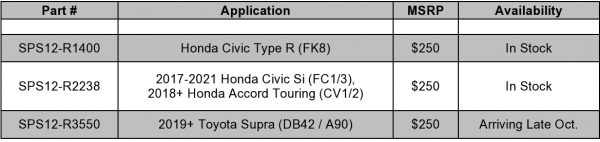
To date, we’re still limited on which vehicles we make our Error Cancellers for, mainly because there aren’t too many Japanese entry-level priced vehicles with Adaptive/Electronic Suspension. However, as we’re getting into product development for European vehicles, it’s only natural that our Error Canceller Kits will continue to grow in vehicle application.
Currently available and upcoming Error Canceller Kits:
Finally! It’s been an exhausting R&D process in getting a coilover available for the newest Toyota Supra. But now we can say it’s an honest improvement to the OEM suspension.
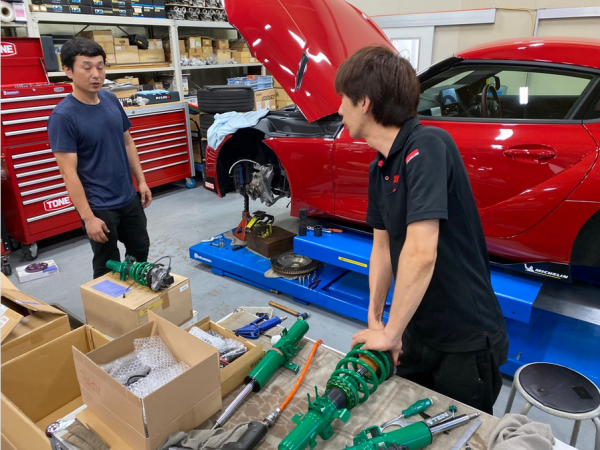
That was the hiccup in getting our coilovers released in a timely manner. While we had early access to the A90 Supra working with Toyota Motorsports in the U.S., this new platform proved to be difficult in getting to actually improve its performance on just suspension alone. But now, with the help of Japanese sports car tuner Matchless Crowd Racing (MCR), we finally have something to offer!
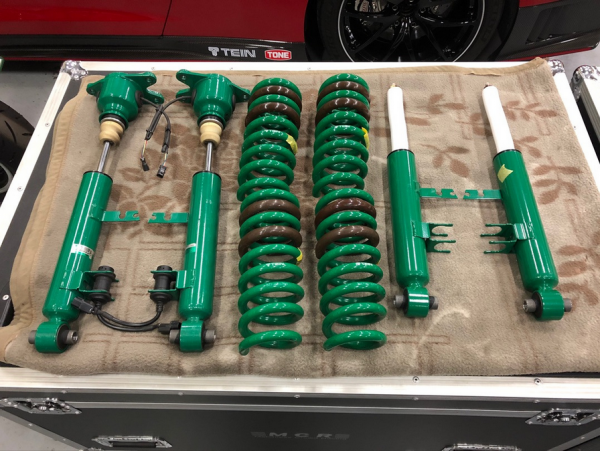
STREET ADVANCE Z (Part number: GSTJ4-91AS3)
MSRP: $1,200.00
*Front-Right and Rear-Right components shown
After nearly two years of R&D on this car, we’re first releasing our STREET ADVANCE Z coilover kit. At $1200 retail, this kit is a great value in high performance suspension for this new car.
Geez. Two years… Why did it take so long?! We won’t go into all the details. After all, if you’re an A90 Supra owner, we really don’t want to say much to offend you. But since you’re reading this, I’d wager in my assumption that you’re looking to increase the handling performance of your car. So…… In a word, it’s a very difficult car to work with. Don’t take our word for it. If you do a quick search on “MCR A90 Supra” you’ll quickly find that MCR’s owner, Kobayashi-san, really doesn’t like the new Supra. According to him, in translated text, It can’t turn, can’t stop, and is slow. Those are supposed to be aspects that a sports car is good at!
MCR A90 Supra
Take it for whatever it’s worth. I happen to like the A90, but maybe the criticism of this car is just simply a tuner’s standpoint (or marketing point) in order to give the aftermarket something to work with and give the end-user something they “need”, if you know what I mean.
The fact is, the new Supra isn’t priced anywhere near other Japanese supercars like the Acura NSX or Nissan GT-R, and for good reason- it simply isn’t built like those cars. It seems like it was built with aftermarket tuning in mind.
MCR staff setting up the STREET ADVANCE Z prototype kit for testing/evaluatingPrototype STREET ADVANCE Z for A90 ready for testing with MCR.
But, it is true- the new Supra is a difficult one. It’s very electronically-laden, much like a lot of high-end sports cars these days. And, again no offense, it is very typical German engineering. That’s not a bad thing. It just takes some time to better understand their design to really improve upon it.
So, what do you get with our A90 STREET ADVANCE Coilover Kit?:
-6kg/mm front springs
-12kg/mm rear springs
-Damping adjustability (16-click rebound) for front and rear dampers
-Rear upper mounts with access holes for damping adjustment
-TEIN Developed Error Canceller Units
-Camber Adjustable Upright Insert
A few things to explain-
Our Error Canceller makes this a plug ‘n play suspension kit by connecting directly to the OEM’s Electronic Suspension control module. Without it, and simply unplugging the OEM dampers will cause a warning on your dash.
Example of TEIN Error Canceller
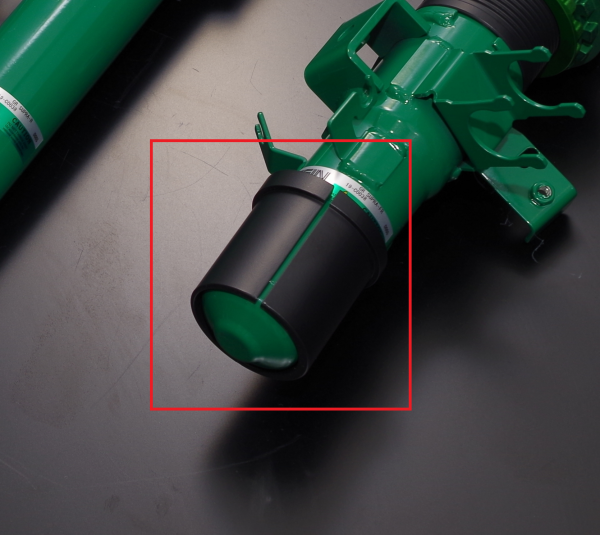
Our Camber Adjustable Upright Insert is a sleeve between our damper and the aluminum knuckle assembly. By allowing camber adjustment from the bottom of the strut, you can retain the OEM upper mount assembly, which is a good design in reducing NVH.
Camber Adjustable Upright Insert shown in red square in above picture.
While installation of our coilovers do void the use of the Factory Electronic Suspension system, you can opt for our optional EDFC ACTIVE or EDFC ACTIVE PRO kit to allow for electronically controlled damping settings.
At last, we finally have a setup that offers true handling performance gains for the new Supra. Better late than never, and better to be well-developed than hastily done, I suppose. Anyway, expect this kit to arrive mid June 2021!
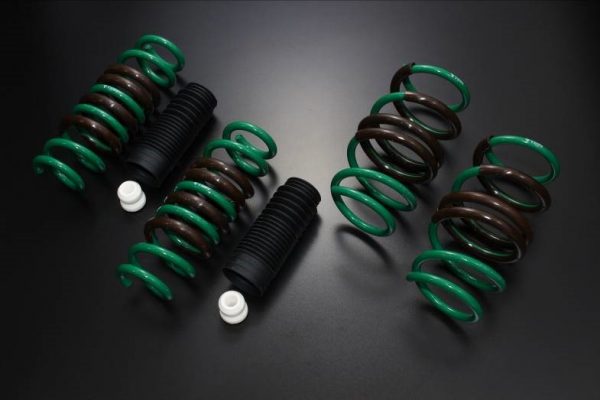
With the newly released S.TECH lowering springs for the A90 Toyota Supra, we wanted to put a notice out to owners about modifications needed to the rear bump stops.
S.TECH Lowering Spring set part number: SKTJ4-S1B00
Our S.TECH spring kit (part number: SKTJ4-S1B00) includes a pair of bump stops and dust boots specifically for the rear shock absorber. However, it is to be used in conjunction with a modified OEM bump stop.
Please follow along as we show you what needs to be done.
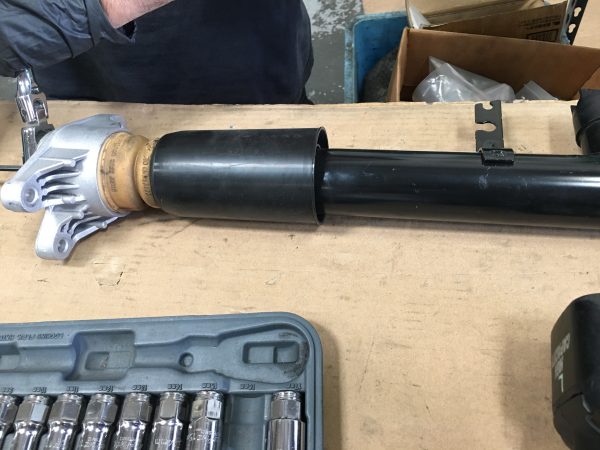
First, the rear shock absorber mount needs to be removed. Then, the the OEM bump stop can be pulled out of the mount. Now, the OEM dust boot is simply press fitted around the OEM bump stop. You can just pull the dust boot out, or you can leave it attached. Either way, the OEM bump stop needs to be trimmed significantly, and the portion to be removed also removes the OEM dust boot. Our included TEIN dust boot will replace this piece.
The rear shock absorber mount needs to be removed from the shock absorber assembly.
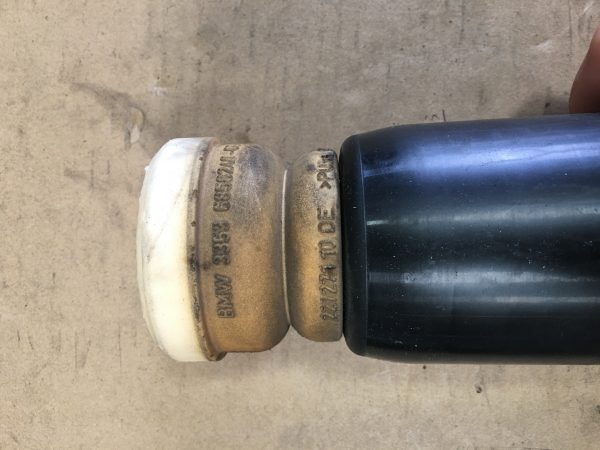
With the OEM bump stop removed, you need to measure 20mm from the top of the bump stop (widest portion) down and mark this location. This 20mm piece will be reinstalled in the rear shock absorber mount. You can use a razor blade (utility knife will do fine) to cut the bottom portion of the OEM bump stop off.
The OEM bump stop and OEM dust boot are assembled as one piece. The OEM dust boot is easily removed by pulling it off the OEM dust boot.The top of the OEM bump stop will need to be remained. This should be 20mm thick after trimming.
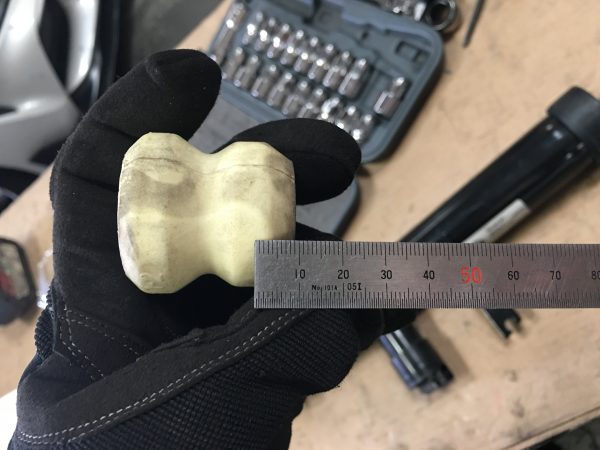
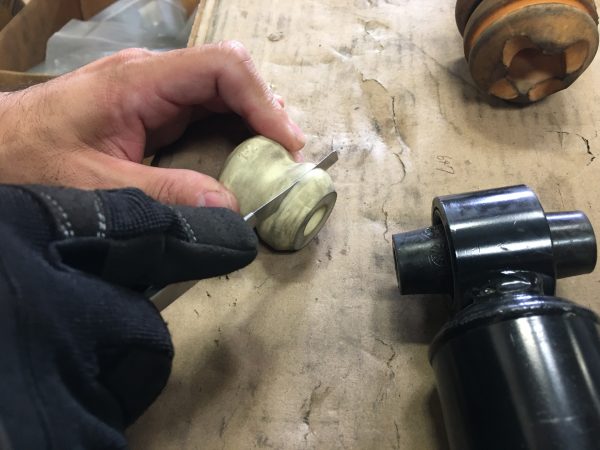
Now, the included TEIN bump stop also needs to be trimmed. 10mm needs to be trimmed off the bottom (narrow portion) of the TEIN bump stop.
The included TEIN bump stop also needs to be trimmed, too. The bottom portion needs 10mm but from the bottom, which is the narrow portion of the bump stop. A utility knife makes trimming of the OEM and TEIN bump stop easy work. Just use caution when cutting.
This picture shows how it is to look on the rear shock absorber (without the TEIN dust boot, for example only) along with the trimmed OEM bump stop.
For reinstallation, hand fit the modified TEIN bump stop onto the piston rod. Then, fit the TEIN dust boot onto the piston rod.
Then, reinstall the rear shock absorber mount (with the trimmed OEM bump stop hand pressed in) onto the piston rod. Now you can tighten the rear shock absorber mount with the 16mm flange nut.
Make sure the TEIN dust boot and bump stop are placed up against the trimmed OEM bump stop (basically you are going to sandwich the top of the TEIN dust boot against the trimmed OEM bump stop and trimmed TEIN bump stop).
The final assembly should look like this. The TEIN bump stop is covered by the TEIN dust boot, and both pieces are pushed up against the trimmed OEM bump stop. The TEIN bump stop is a tight fit around the piston rod in order to keep the TEIN dust boot in place and to protect the piston rod from any debris damage while driving.
The rear shock absorber assembly is now ready to be installed back onto the vehicle.
We’re glad to see Moto IQ’s Project Supra make a return to their webpages! It’s a long-going process for this car, as it has essentially received a full makeover, from engine/trans, to body, and of course suspension. Just like real life, the crew at Moto IQ are taking the time to really sort this Supra build out. I mean, don’t you all take your time with your builds?! I’d hope so! No half steppin’ your project cars, no cutting corners, guys and gals!!!
Just over a year ago, we had taken in their TYPE FLEX coilovers for a rebuild. At the time we were addressing the rebuild, we wanted them to try out our ADVANCE NEEDLE for damping force adjustment (which became an addition to our STREET FLEX setup when they superseded the older Flex setups).
However, we also thought this car to be a good candidate to try out the [then new] EDFC ACTIVE setup we had released at around the same time. So, now it’s installed, and all they need to do is get the EDFC ACTIVE controller calibrated for its mounting position!
We’re looking forward to other updates on this car. Again, they’ve done a full build on the motor, so we really want to see what this street hulk can do! We may be suspension guys, but horsepower and torque are other things we love too 😉
Our friends at MotoIQ decided to stop in and have their Type FLEX coilovers for their Project Supra rebuilt! While they were here, we gave them an inside view of our overhaul process. Not necessarily something we allow the public to see first-hand. But, we are talking about MotoIQ here, guys that like to nerd the hell out on car stuff. We couldn’t easily keep the door closed on them! Lol!!!
This Project Supra of theirs is pretty nuts to begin with. So we were glad to see that they wanted to continue the use of their older Type FLEX coilovers. However, we thought it would be a great idea to update the internals to the newer STREET FLEX setup. So, we had our in-house engineers work closely with the MotoIQ staff to get their dampers to the lastest specifications from TEIN!!
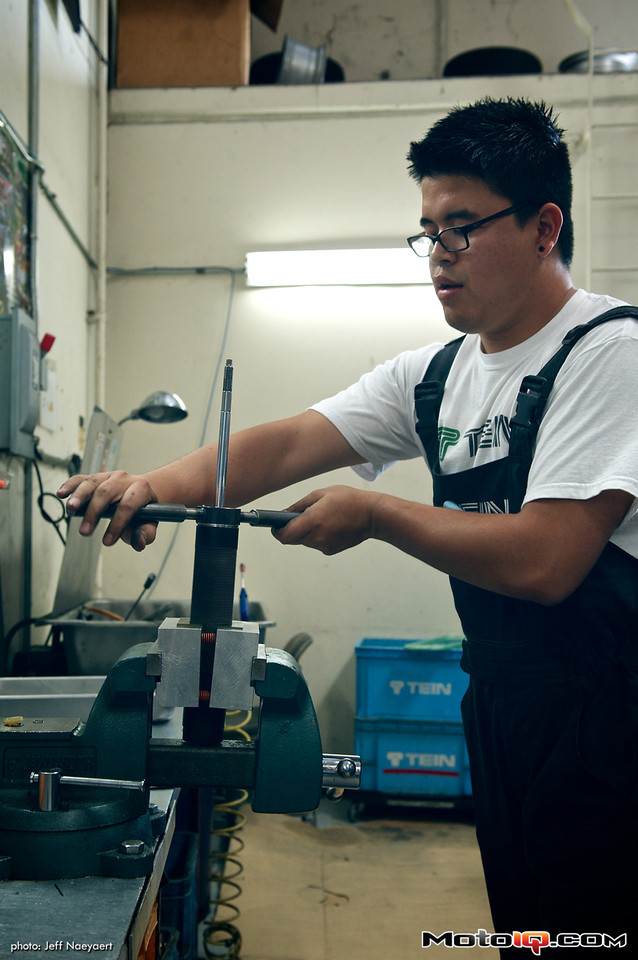
We had our R&D staff take them through our overhaul process and show, from start to finish, what goes into our rebuilds.
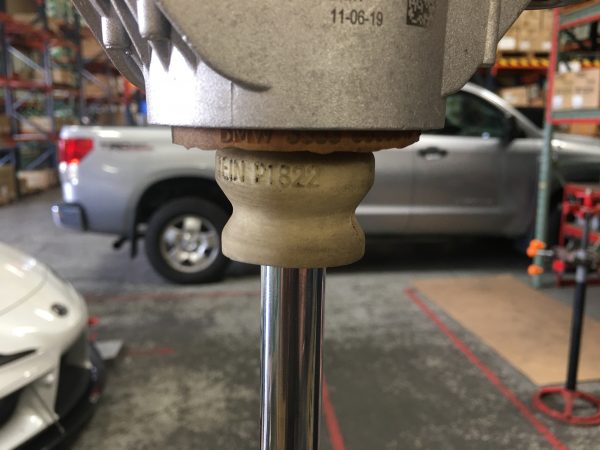
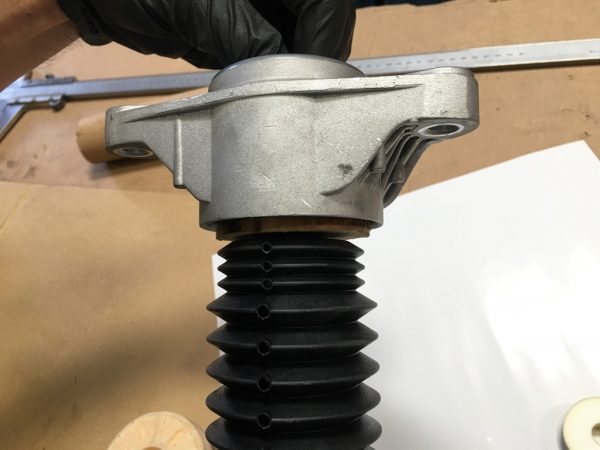
After a disassemble of external components (lower brackets, seat locks, upper mounts, springs, dust boots, & bump stops), we can start complete teardown of the damper itself. Our dampers require some unique tools for some parts of disassembly, which is why we do not offer rebuild kits to the public. We ask that all customers send their dampers to us for servicing.
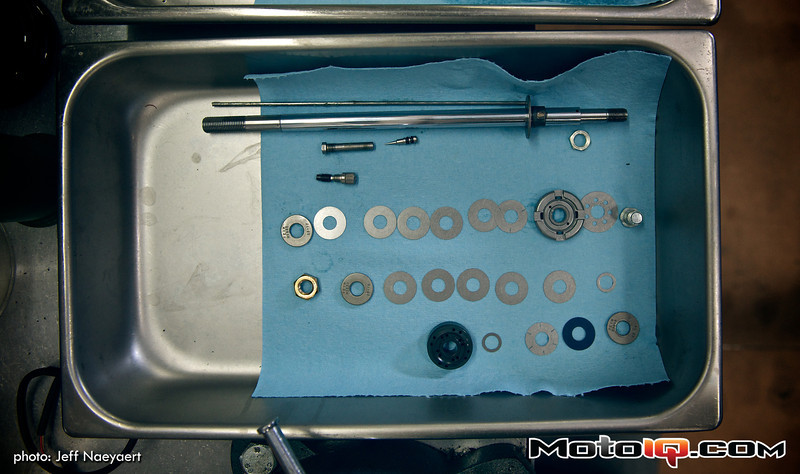
Once completely torn down, we can get to work on the internals. The piston shaft is broken down into several components. Once we can loosen the lower nut on the piston shaft, the piston valve assembly, including all shims and washers, can be removed. These components will be replaced with new ones. Whenever possible, we want to keep rebuild costs as low as possible for our customers, so we will try to reuse components that are still in excellent condition.
Once we can completely assess the condition of all components, we can then get to work on rebuilding. In MotoIQ’s case, we had to make some modifications to make the newest STREET FLEX setup work with their coilovers.
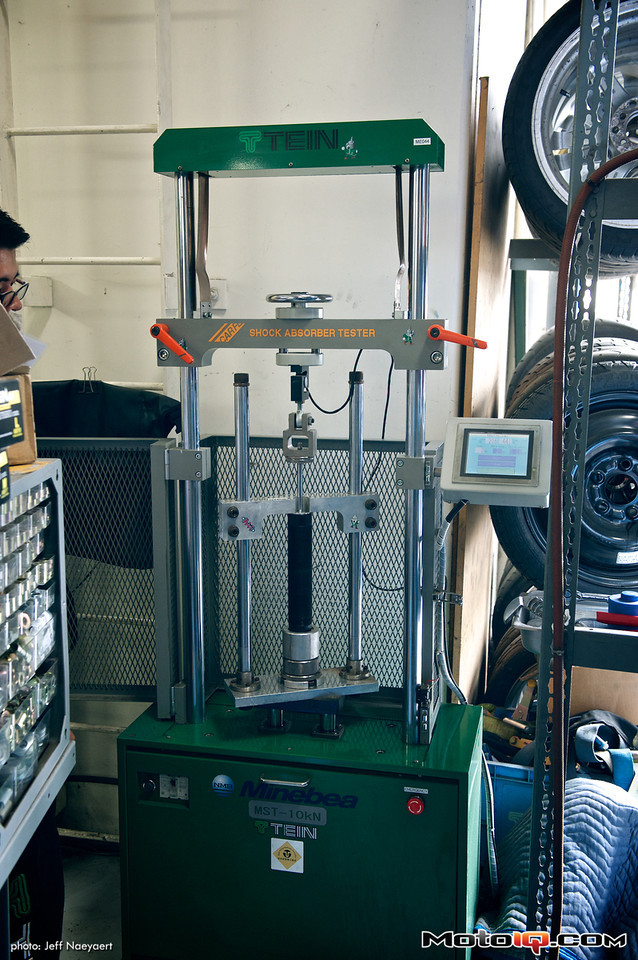
After all the necessary modifications are completed, we completely assemble the dampers, fill with nitrogen, then run them on our damper dyno and make sure they meet performance specification.
All other external components can then be reinstalled and the completed dampers sent back to the customer! All that’s left is to install, check/fix alignment, and enjoy!
We look forward to the next installment from MotoIQ on their Project Supra! They also have our EDFC Active to test out, so we’re sure they’re busy nerding away with that!
Please note that our overhaul and revalve service is available to the public. So, if you have any questions on our overhaul services, please give us a call at 562-861-9161 for more info! We’re glad to help!!!
In the meantime, please visit MotoIQ for some great technical information and follow along on their Project Supra build!
If you did not already know. The TEIN USA homepage has an Online Retail Shop where replacement parts, goods and specific products can be purchased.
It was recently updated with a host of coilover kits, single replacement dampers and Fujitusbo Titanium exhausts. Check it out, it could save you some money. Look in the “Special Offer” category of the Online Shop.
SAVE $350-400
Average savings on selected coilover kits is $350-400. All kits are brand new in the box.
Applications include: Audi, BMW, Ford, Lexus, VW and more…