Bump Stop Trimming

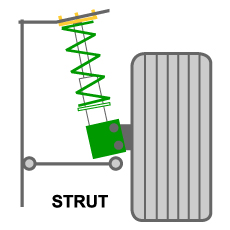
Without a doubt lowering springs is easily one of our biggest sellers. It’s a simple upgrade for someone wanting to lower their vehicle but not wanting to really sacrifice much in the way of ride quality, and it’s also much more affordable than a coilover kit. This is an especially common upgrade for people with newer vehicles, or cars still under warranty (or maybe they don’t have much to spend since they just got a new car).

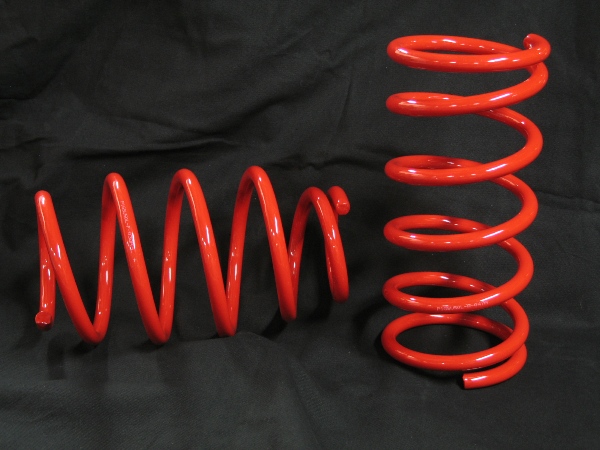
As many of you may know, we make our lowering springs compatible with factory (OEM) dampers. Not necessarily in just fitment, but also in spring rate. Our lowering springs are not very aggressive. If you take a look at our lowering springs’ specifications for your vehicle, you may see that the ride height drop is not too aggressive (maybe better than some other manufacturers). Some other applications of our lowering springs may seem to be very aggressive. It’s all a matter of how much room we have to play with when designing our lowering springs.

Most important for customers is reducing the tire to fender gap. As of the past few years, the request is for a “flush” fitment, where the tire just closes up the gap with the top of the fender opening. As much as possible, we want to create that type of fitment for the customers, even making a staggered ride height drop for front and rear to achieve a nice and even wheel gap. But, where we reach limitations is the factory damper stroke length.

Some factory suspensions have very limited stroke length, and this makes it increasingly difficult to design a spring that will aggressively lower a vehicle. That isn’t the only limitation. We look at clearance with the fender, within the wheel well, as well as how it may affect steering/suspension geometry. We always design our lowering springs to give you the most ride height drop in as safe a level as possible.

So, in regards to trimming bump stops- why is this important? If we find that aspects, other than damper stroke length, seem to be very generous, we know that we can make a lowering spring that will work with a shortened bump stop. So we include a chart by vehicle application that shows how much you will need to trim for front and rear when installing our lowering springs.

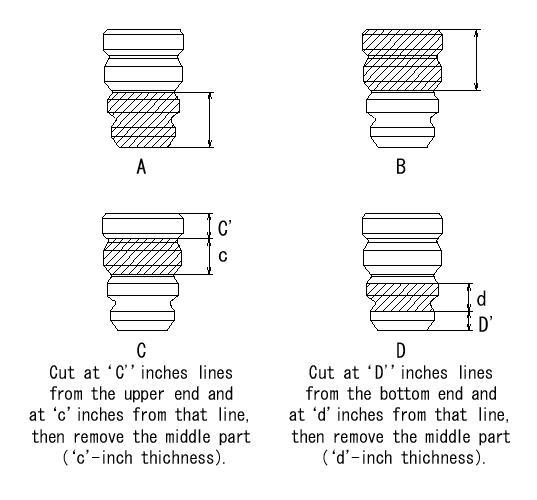
Some cases may require a different type of trimming style for the bump stop. Typically it is just trimming the bottom portion of bump stop and retaining the top piece (A Type). Sometimes it’s the reverse (B Type). In other cases, you may need to trim a middle section and retain the top and bottom piece (C or D Type). See below the different style cuts we recommend, depending on the vehicle:


bump stop trim style

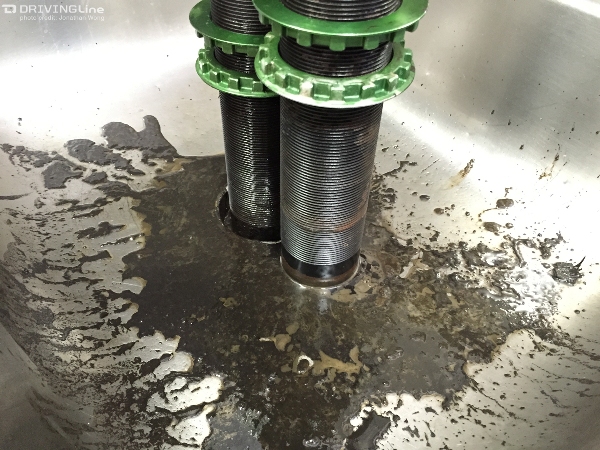
We know several customers skip the bump stop trimming step. This can cause several issues. We’ve added this measure so that you can retain a bit more stroke length at the newly lowered ride height. This also helps improve ride quality. Because the bump stop is made of a high durometer polyurethane material, it is like a secondary spring, but a really stiff secondary spring. Since the dampers are not valved to handle such a stiff secondary spring, it can make rebound feel really harsh. Some may say bouncy. Constantly hitting the bump stop can cause the damper to prematurely wear or potentially blow out, too.

bump stop trim 001

Bump Stops come in all sorts of goofy shapes. Mind you, these were engineered with a specific design.

bump stop trim 003

The bump stop itself is a really lightweight piece, but it is of a high durometer and takes a lot of force to compress. At least it is easy to cut into.

Fortunately, you can cut easily into the bump stop using a box cutter/safety blade. It slices pretty easily.

bump stop trim 004

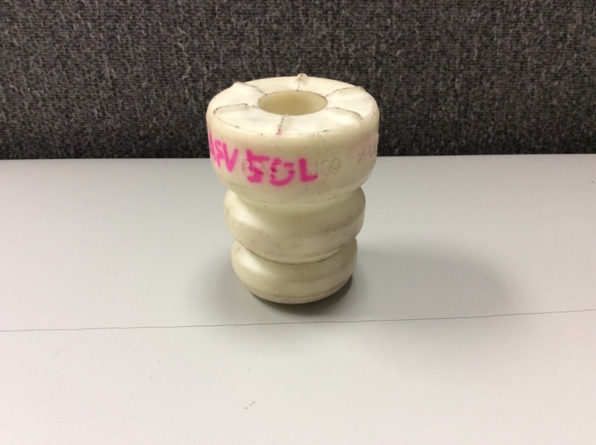
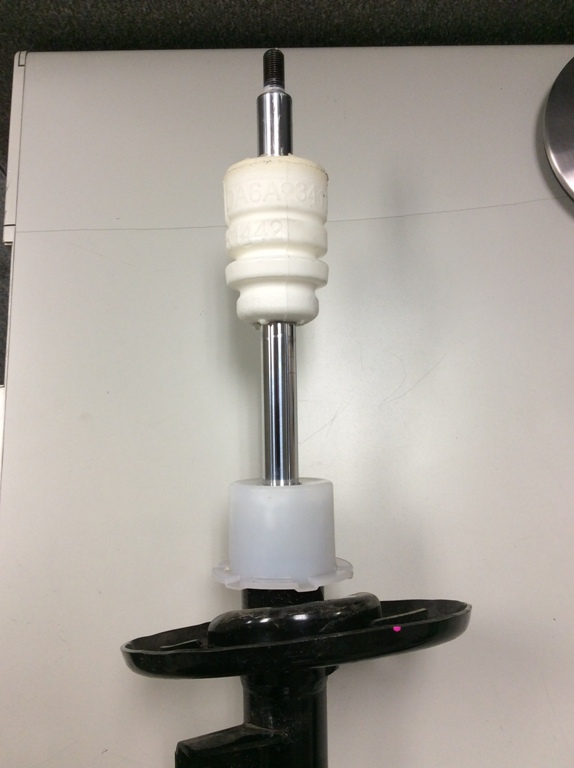
Here’s a picture of a 2015 Camry bump stop. This is a more typical design that we see- top is a larger outside diameter and tapers, with billows that make it easier to determine which section we recommend trimming.

bump stop trim 005

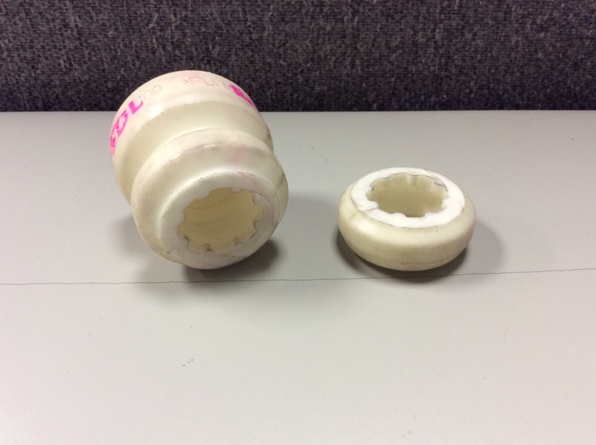
Using a safety blade, we’re able to cut a bottom portion of the Camry’s bump stop. We’ll be retaining the larger piece on the left and reinstalling onto the front strut.

bump stop trim 006

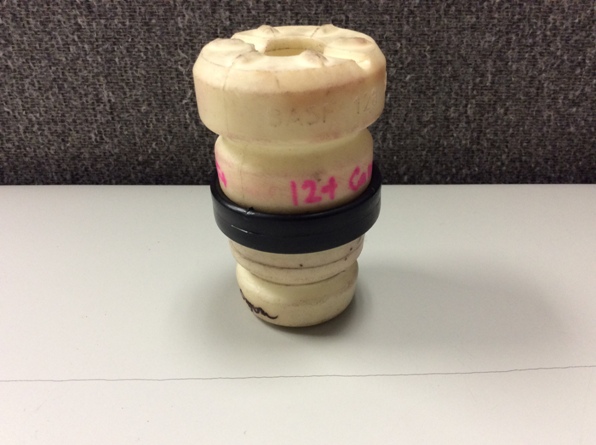
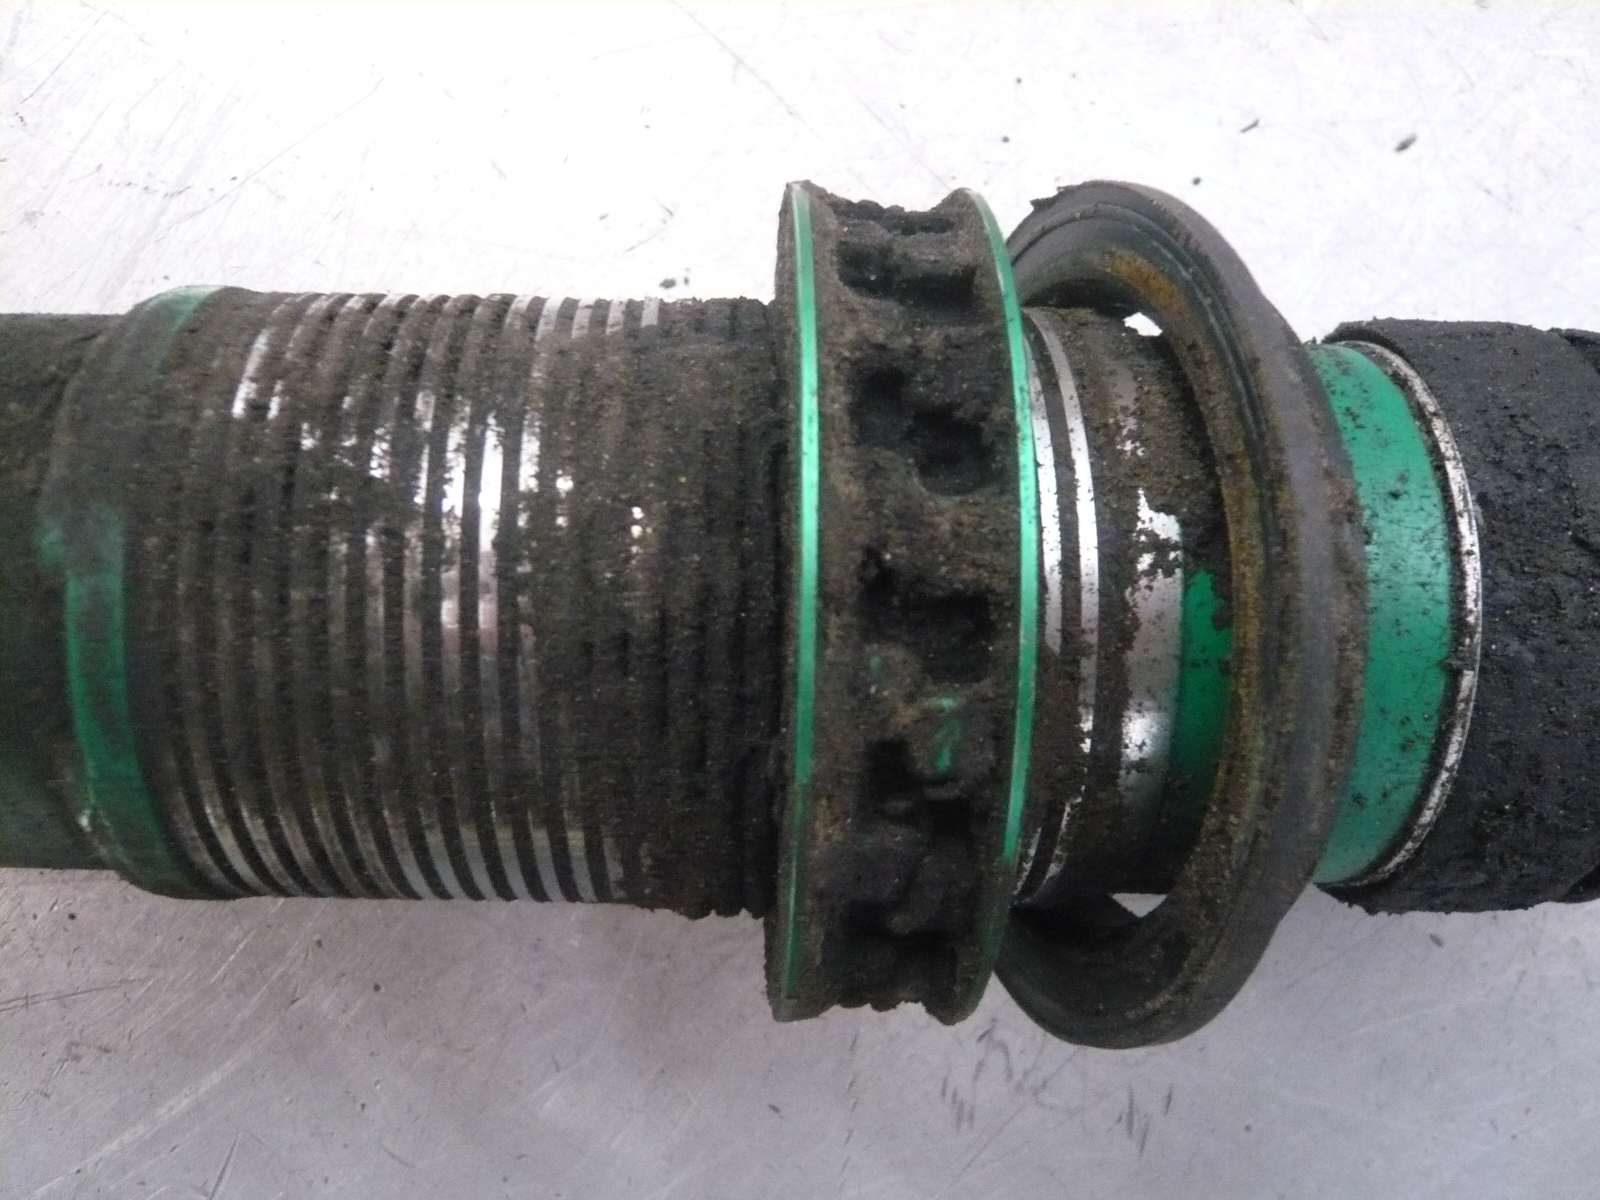
This bump stop uses some plastic ring, likely to control the bump stop’s compression. In our case, we need to trim a middle section.

bump stop trim 007

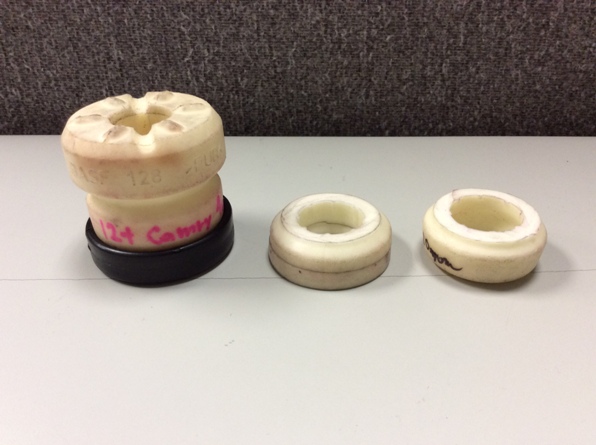
We cut this into three pieces, and the middle piece will be removed. The remaining top (left) and bottom piece (right) will be reassembled on to the damper.

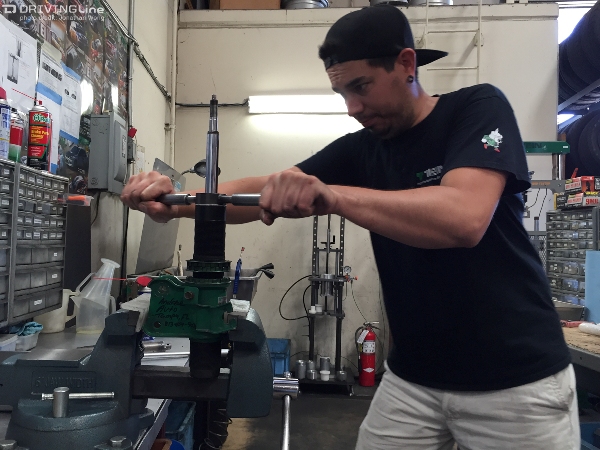
So, while you will have your suspension taken a part for a little while when installing our springs, take the time to see if your bump stops will need to be trimmed. Check the included instructions with our lowering springs to find out that info.

Specialized Lowering Springs?

We rant on and on about our ability to make custom damper kits for vehicles, especially vehicles that no longer have any aftermarket support. This program is the easiest way to get a custom set of suspension made for an otherwise obsolete vehicle.

What we fail to really mention is that we have the ability to do custom springs. Actually, we take that back- we have mentioned that, because some kits don’t allow the use of a ride height adjustable setup. For vehicles that utilize a spring separate of the damper, we custom wind springs specifically for that application. So, there you go! We can make custom springs for you!

We recently did a set for Toyota. While we cannot cough up the details just yet (I’m sure you can figure it out if you search hard enough within this post 😉 ), we’ll just say it is for a platform we don’t already have product available for. And actually, they weren’t looking to do much to this car. The request was a set of lowering springs that would give the car a 1″ drop front and rear.

And here they are:

SPD (Toyota Highlander Lowering Spring) 003 resize

If you’re thinking “What the hell is an Eibach spring doing in a TEIN blog post?”, well then that’s a burn. This red color was at their request. That’s fine by us. We can basically do custom colors anyway. So if they want red springs, red springs it is!!!
We must mention that custom springs are not cheap. A set of four coil springs go for $700 retail. Ay yi yi!!! However, if this is something that may lead to a person wanting to do a private line of springs through us, the cost (which includes a development fee) will basically be covered on the first spring order. Not uncommon, as we’ve done that before, especially with our coilover kits.

We can also do remanufactured springs (springs of an older/discontinued line). Those start at $560 retail for a set of four.

The only types of springs we do not manufacture are torsion beams/bars or leaf springs.

So, if you have a need for custom coil springs, give us a ring. We can definitely help you out!!!


The Importance of Damper Maintenance

Well, by now you know that we are able to service our suspension, whether it is a damper rebuild, or in the case of the new STREET BASIS Z, STREET ADVANCE Z, & FLEX Z- replacement single dampers can be purchased.

So then, why is it still important to maintain your suspension?

Quite simply- cost. Just because we can service our suspension, it doesn’t make it a wise idea to run them dirty or to not periodically inspect the dampers and all its components for any wear, or to make sure they’re torqued properly (spring seats/seat locks, nuts, etc.). We don’t feel it to be necessary to spend a lot on overhaul. I mean, we appreciate the business and all, but we don’t appreciate your screaming when you get shocked by a rebuild quote. Lol.

We say this because it isn’t uncommon for an overhaul customer to complain about our overhaul prices. Yes, we do have a base overhaul fee. This fee covers the replacement of seals and o-rings, refreshing damper oil with new damper oil, recharging with nitrogen, and of course the labor to do this work. But, components such as the piston shaft, ring nut, piston guide, piston valve, these are all extra components that get added above the base overhaul fee’s cost if we find it necessary to replace. Lately, we’ve been seeing 5-10 year old coilover sets hovering around the $200 (each damper) range for a rebuild. That amounts to about $800 a set. Nearly the cost of a new coilover kit, depending on the model.

DL-TEIN-EDIT-3

One of my favorite pics from Jonathan Wong at Driving Line when he came to check out our overhaul service. Damper oil should never look like this. That is way too dirty and shows that the damper was drawing in dirt as it cycled (probably through a blown seal). This can wreak havoc on the dampers’ internals, and bring overhaul costs to some exorbitant amount.

Don’t get me wrong. If I personally saw a rebuild quote near that amount, I’d probably bust a vein on my forehead. I’m no different than a lot of consumers. Money is tight, yo! I can’t be spending on unnecessary things.

Back to damper maintenance- It’s actually really easy to do. And, if you can’t do it yourself, take it to any of our authorized dealers for service.

P1070072-use

Pretty crusty, mang. That’s way too much dirt on the threads. May not look like a big problem, and for the most part it should come off easily. But it some cases where this type of dirt gets lodged into the threads and seat locks/spring seats, it can cause them to seize. The only way to remove- cut them off.

Honestly, simply keeping your suspension clean is the easiest step. Suspensions sit inside the vehicle’s wheelwell. This exposes all its components to the elements. Road debris such as dirt, gravel, mud, road salts (in places where it snows heavily), and such, can all adhere to the damper body. This can get lodged into so many places that can cause damage- threads where the seat lock/spring seat assembly adjust for ride height, around the dust seal at the top of the damper (where the piston shaft slides in and out of), around the pillowball mount (if applicable for your coilover application). This dirt can get stuck in any of these places and cause seat locks/spring seats to seize or piston shafts to get scratched.

Why this is a problem is excessive wear. A seized seat lock/spring seat will be increasingly difficult to remove and adjust. In some cases customers send in their dampers just so we can cut them out and purchase replacement pieces. That’s an unnecessary cost to me. Those things should last about the whole life of your suspension.

Scratches on the piston shaft can cause the nitrogen charge to leak out, affecting damper rebound, and eventually affecting damper life as oil can eventually leak out. And when oil leaks out and owners continue to drive for several hundred or thousands of miles, it causes more internal components to wear out, only adding to overhaul costs.

resize0001 (1)

A piston shaft scratched, but not by dirt. Actually, the customer tried using pliers to hold the piston shaft in place while they tried to tighten down the nut to secure the upper mount to the coilover assembly. Still enough to cause problems to the damper and excessive damage to the dust seal.

resize0002 (1)

Worn threads due to cross-threaded nut installation. Again, not typical wear and definitely not something we’ll be able to repair. A new piston shaft needs to be ordered for this case. That’s an extra $40 on top of the base overhaul fee.

We realize this sounds like a lot of work. After all, you’d have to get the car off the ground, wheels out of the way, then go into each wheelwell and clean up the dampers. But, so it goes in the world of adjustable suspension. You pay good money for high performance handling, but it doesn’t mean your car is maintenance-free.

Seriously, take the time to clean your dampers. It can be twice a year (in areas where it doesn’t snow), or 4 times a year. Be adamant of making sure your suspension is in tip-top shape. Also, while you’re down there, inspect your dust boots and bump stops. Those should have good pliability and no tears. Dust boots are a good preventative measure in keeping dirt away from the piston shaft and dust seal.

We hope this helps all you performance suspension owners a little bit, for whatever it’s worth to you. In the end we want you to enjoy your suspension for as long as possible, without having to spend a bunch of money to make sure it runs properly.

“Yeah, I’ve got a set of TEIN Coils”

Whenever we hear that (blog title), we tend to understand that a customer has a set of our lowering springs. However, for some strange reason, people online or that call us are referring to our suspension kits as coils, whether it be a complete suspension kit like a STREET FLEX or STREET BASIS,  even a SUPER RACING setup.

We must ask- WHY ARE YOU REFERRING TO THEM AS “COILS”?!

We’re just as guilty, using different terminology than what some people may understand. For example, saying “coilover” implies simply that- a coil over a damper. This is how most people know of our product since our height adjustable setups are typically coilover, but is this a coilover?:

stfa z33

STREET FLEX for 2003-2009 Nissan 350Z

As pictured above, this “coilover” kit uses our Height Adjust System (H.A.S.) for the rear, as pictured on the left. So it is in fact not a “coilover” with exception of the fronts (pictured on the right). We’re wrong for ever referring to such kits as a coilover package. Instead, this is a suspension kit. But, for simplicity’s sake, and in acknowledging what are customers know us for, we continue to call them coilovers. It’s easy, and it won’t confuse our customers.

There are other things/terminology we may use that may be either incorrect to some, or just named differently. For example, the name “Shock Absorber”. It is in fact a “Damper”. Shock Absorber is incorrect because it isn’t absorbing shock. What it is doing is turning kinetic energy (the up and down motion of the vehicle and unsprung mass) and converting it into thermal (heat) energy. Nothing is really being absorbed. It is a transfer of energy from one form to another. However, most people understand them to be Shock Absorbers, so we just roll with it.

And yes, it is “Damper” and not “Dampener”. They may share some similarities in meaning, but they’re in fact used differently. Dampener is typically used to describe a wet or moist condition. But it can also be used to describe a deadening or depressing. Damper, on the other hand, is mainly used to describe a reduction in oscillation or amplitude of force.

We also hear people ask for “Pillar Ball Mounts”, which is easily understood to be (how we know it) Pillowball Mounts. Not a big deal.

Another one that we hear is when people refer to our Seat Locks and Spring Seats (where you can adjust a spring’s setting and vehicle ride height) simply as “rings”. Sometimes we hear them being called “collars”. We use collars, but they are usually much smaller and are used as a spacer in our upper mount assemblies.

That’s another one- upper mounts being referred to as “top hats”. Not really a big deal, and some upper mounts kind of look like top hats. So, [top] hats off to you for using that description!

Willy-Wonka

Willy Wonka wears a Top Hat. He can also be condescending sometimes.

There are some less obvious things that we cannot fault a person for. For example, our inverted dampers for strut type monotube setups, like our older MONO FLEX and our SUPER RACING. People will refer to the shiny part of the damper assembly as the piston or piston shaft. Again, although that is incorrect, we cannot fault the customer for that. Since the damper is inverted, the whole assembly is upside down. The piston shaft is now on the bottom side and inside of the threaded shell case.

mflp gdb

MONO FLEX for 2002-2007 Subaru WRX

In the above picture, the shiny rod coming out of the threaded shell case (black) is in fact the damper body and not the piston shaft. The piston shaft is itself inside the threaded shell case and completely out of view.

There’s also the use of the name “Serration Bolts” which we use for the studs in our upper mounts (that secure the upper mount assembly into the strut or shock tower). We realize that confuses a lot of people when they need replacements of these components. Sorry!

The use of “Strut” may also be confusing for some. The above picture of the MONO FLEX for Subaru WRX shows struts, which this chassis of Subaru uses for front and rear. When we say strut, we’re referring to the MacPherson Strut design, which other than being a damper, also serves as a structural member of the suspension by supporting the knuckle assembly. The knuckle assembly comprises of the wheel and brake components. Struts have to be a bit larger in size and be able to handle large side forces/loads.

In comparison, a “SA” type of damper (short for “Shock Absorber”), which is used in Double Wishbone or Multi-link type suspensions, doesn’t have to support such side loads. They are used strictly to control vehicle motion. This is also why we don’t make camber adjustable upper mounts for our SA dampers. It’s position or angle will have no affect on wheel camber.

img01img02   Can you see the difference between these two suspension designs?


For sure there are other things we hear from customers, but this covers a majority of terminology we hear.

Hopefully that helps break down some of our terminology for suspension components!

JCCS THIS WEEKEND (Sept. 19, 2015)!!!

It will be our fourth consecutive year attending the Japanese Classic Car Show (JCCS) out by the Queen Mary in Long Beach, CA! Event starts at 9a and goes until 3p and is free to the public!!!

Japanese Classic Car Show Website

While not known for really being related to older vehicles, we do have our Specialized Damper Program. This is the perfect program for such vintage vehicles that no longer have a strong aftermarket support program. We’ve used this for many older vehicles in Japan, and it continues to grow Stateside!

DSC_1861 resize

Apologies, but we didn’t have a Japanese classic last year. Hopefully this year??

Anyway, we’ll have our booth setup with TEIN goods for sale. We hope to see plenty of you there!!!!!

DSC_1885 resize DSC_1875 resize DSC_1889 resize


First Set of Evasive-Spec SRC w/ 3-Way

Our friends at Evasive Motorsports have a date at the race track later this year. And while their S2000 is still in pieces, starting to be reassembled, they had sent in their very own Evasive-Spec Super Racing (SRC) coilovers for a rebuild.

But wait, there’s more!!!

They got wind of our new 3-Way units designed specifically for our Super Racing coilovers. They figured since they’re going all out on this S2000 this year, they wanted to upgrade their SRC’s to get the most out of it. Of course, we still needed to test it. Just having received the units a few months ago, we have now been able to start work on them.

We just recently posted about the 3-way units and their benefits. This car is going to Buttonwillow for the end of the year event- Global Time Attack’s Super Lap Battle. This is a great venue, and the course has plenty of challenges. It’s also less than perfect, with plenty of rough surface transitions, bumps, curbs, etc. This is an grueling test for both driver and machine, and this easily this makes Evasive’s S2000 a great candidate for the 3-way modification.

SRC 3-Way OH 001

To make a long story short, we said “OK” then they said “Cool”, and we were like “Awesome”.  After several rounds of back and forth acknowledgement, we got to work.

While we do not have details on the cost of the units and revalve service just yet, Evasive shelled out some [MAJOR] ducats and got them installed while we refreshed their dampers.

A simple glance at the coilovers wouldn’t reveal a whole lot. The 3-way unit itself is adapted directly to the External Reservoir, but it looks different (noticeably larger) than the Base Valve adapter it replaces.

EVS SRC with 3-Way (assembled) 015 resize

A Front and Rear SRC side by side.


Also, the SRC dampers still maintain EDFC series compatibility. It is just that it only works for Rebound and Low-Speed Compression. High-Speed Compression will be left as a manually adjusted setup.

EVS SRC with 3-Way (assembled) 025 resize

Front damper with EDFC Motor on Compression (External Reservoir) and Rebound (Top of piston shaft).

EVS SRC with 3-Way (assembled) 022 resize


EVS SRC with 3-Way (assembled) 020 resize

Rear damper with EDFC Motor installed on compression and rebound.

We’ll try to get you guys some updates on this as Evasive’s project car nears completion. They have a test day planned, which I’m sure they’ll document. We’re looking forward to getting these units fully evaluated by them!

3-Way Damper Customization for Super Racing Suspension

This has been a long time coming. We’ve actually had 3-way damping (Rebound, Low-Speed Compression, & High-Speed Compression) technology for a long while now, made for our N1 suspension. But, it is very expensive and mainly reserved for race teams only. We also developed one for our Gr.N and 4×4 dampers, which are much more robust units, but these offered a wider range of tuning possibilities due to rally suspension needing the highest available tunability because of the higher piston speed range these dampers have. As you can imagine, this was an even more expensive unit.

4x4 damper

Here’s a 4×4 Damper with 3-Way Unit installed on the External Reservoir.


4x4 3 way

As you can see, the 3-Way Unit for our 4×4 Damper doesn’t look much different than the newer units we’ve just come out with. That’s because the new ones are nearly a direct derivative of the 4×4 Damper (and Gr.N) units, just much more affordable in terms of manufacturing cost. The technology, which is proprietary, is just about the same.

Now, we’ve developed a much more affordable (in comparison to the original units), less complex, and effective unit based around the Gr.N 3-way unit’s design that we will start doing testing on very soon!

SRC 3-Way OH 001

The 3-Way Unit (Silver) is made as an adaptive system to our Super Racing coilovers. We replace the original ADJ System, as we refer to it (or Compression Adjuster, if it’s easier) with our 3-Way Adjuster Unit. As you can see, we have two different designs depending on how we mount the external reservoir.

What’s so special about 3-Way damping? Well, this specifically affects the compression side of damping. The thing is, while we can easily tune a damper for what we believe to be the most ideal conditions, race cars see various changes in track surfaces that can affect their elapsed time. Race tracks can be a mix of glass-smooth surfaces followed by huge bumps or kerbs, and even expansion joints, or just rough surface transitions. This can unsettle a car quickly, and the less time on the throttle means seconds being added to the elapsed time.

Such surface transitions require a damper that responds to such instances by allowing the compression side to actually soften for a brief moment. If you think of it from your car’s tires’ aspect, an increase in damping force as piston speed increases can cause the tire to momentarily lose contact with the surface (hop). That means a loss in traction. Remember, a car maintains its best mechanical grip when all four tires maintain contact with the surface it rolls on, and that means the driver can keep on the throttle for a longer duration.

Many of you may have heard of “Digressive Valving” for dampers. What this means is that as damper piston speeds increase, the damping force has actually decreased (instead of increasing exponentially as this speed increases). Many dampers, by design, are technically digressive valving. However, the drop off in damping force may not be as much as some manufacturers are expecting. So, some may use some type of blow-off valve that opens extra ports as piston speeds increase instead of just relying on the shim stack assembly, and this creates a greater drop off in damping force as piston speed exceeds a certain level.

Low-speed, both in terms of vehicle speed and damping speed, is easier to control. There is very little resistance to the tires contact with the road surface. It is when vehicle speed or surface changes occur that mechanical grip becomes more of a concern.

To correct for such instances, race dampers have some form of high-speed damping control, and mainly on the compression side. This is where our new 3-way unit comes into play.

As mentioned before, we have already had versions of this, the most popular being on our Gr.N coilovers for rally. Think about the road surfaces that rally racing has- loose gravel, gaps, jumps. These are all things that can make a tire lose contact with the surface quickly. We’ve done really well with our 2-way adjustable Super Racing dampers, but as race cars get faster and faster, their suspension needs to cope with potential road surface transitions and react at a much quicker rate. We’ve been trying to get a 3-way version of the Super Racing dampers out to market, but it was just too expensive with our previous technology. So, we now hope to have something a bit more reasonable! However, we’ll only offer this as an upgrade under our overhaul service.

Also, if you’ve ever heard people talking about unsprung mass (weight not being supported by the suspension under gravity) as a concern, it is because heavy unsprung mass (tires, wheels, brakes, knuckle/hub, etc) can cause great upward deflection momentum, and that means a tire can lose contact with the road surface for much longer (in terms of fractions of a second). While we can try to combat that upward momentum by increasing spring rate (to try and speed up rebound force), it doesn’t benefit the compression side. In fact, this only exacerbates the problem with lost traction. What we want is a damper that has the ability to control a wider range of compression speeds. This will help keep the tires in traction, or as some people say- keeps the car planted.
For now we have only developed them as optional units for our Super Racing setup, and we’ll have one of our closest sponsored parties using them for this year’s Global Time Attack Super Lap Battle finale for the 2015 season. The racetrack, Buttonwillow Raceway Park, is a great test for us as the road surface has all sorts of transitions and undulations that can really hamper a vehicle’s ability to be fast.

SRC 3-Way OH 005

SRC 3-Way (EVS) 007 resize

SRC 3-Way (EVS) 010 resize

This 3-Way Unit is specifically for our “SA” type dampers, or dampers for double wishbone or multilink suspension. Basically it is directly mounted to the damper body.


SRC 3-Way (EVS) 014 resize

SRC 3-Way (EVS) 015 resize

For our Strut Type suspension (Inverted monotube design), or where room doesn’t allow us to mount the external reservoir and 3-Way Unit directly to the damper body, we can do a remote setup, this give us some flexibility in mounting the external reservoir/3-Way Unit to the vehicle. As much as possible, though, we try to keep the remote hose as short as possible.

Stay tuned for more updates on our 3-Way testing.

DrivingLine.com Gets a TEIN Overhaul

Like that title picture??? Pretty gross, and this is what can happen when you wait to long to service your TEIN dampers! LOL. Actually, that’d be more like worst-case scenario.

We recently got to work with Jonathan Wong of Driving Line, an online magazine focusing on all aspects automotive related.

Several years back, when Jonathan was still at Super Street magazine, we had provided him some of our SS-P coilovers for his ED Civic Hatchback project, a vehicle that he wanted to maintain a lot of JDM appeal. During that time, we had revalved the dampers for more track use.


DL-TEIN-EDIT-8

Now, Jonathan uses the car for occasional street use, and comfort is more of a concern than track-like handling. It was an ideal time for him to come in, get his dampers revalved, and also see what that type of service entails. *The title picture isn’t his actual damper, btw. He does a good job of maintaining his ride.

DL-TEIN-EDIT-5

DL-TEIN-EDIT-7

Although we talk quite a bit about our overhaul service, Jonathan points out something very true- not a lot of customers are aware of this service. With some of the new coilover lines we’re introducing, such as the FLEX Z, STREET ADVANCE Z, & STREET BASIS Z, which don’t require rebuilds, chances are that customers will never really know what else we can do with our existing products. It isn’t uncommon for customers to get our kits second-hand, and most don’t know much about our brand after that.

As for all TEIN suspension owners out there, we must mention that there is no set rule for when a damper should be sent in for servicing. Some customers may send in their set well before 30,000 miles of use. We’ve seen others come in with well over 100,000 miles of use. We do recommend inspecting your suspension every 30k miles, though. Really, it’s up to the customer to inspect and maintain their suspension. Surprisingly enough, simply keeping the dampers clean may extend the life of the dampers. An area prone to causing damper leaks is at the top of the damper body (not the piston shaft). At the top of the damper body is a dust seal where the piston shaft slides past as it functions. Spraying this area with water, or even with WD-40 or something similar, helps keep the dust seal debris-free and prevents it from getting damaged and eventually leaking any of the gas charge. Doing this also keeps the piston shaft from scoring from such debris. A damaged piston shaft can be anywhere from $40 and up depending on the model (on top of the base overhaul fee).  If you’re doing this type of maintenance, it’s also good to inspect the rubber dust boot and polyurethane bump stop for any damage. They can easily be replaced and are a good insurance to maintaining a long lasting damper.

DL-TEIN-EDIT-2

Here’s R&D Assistant Chris A. disassembling a FLEX damper for service.

We’re glad that Jonathan was able to see himself what we could do. Definitely some good insight for customers with our products and to know what we can do for them!!!

A Cleverly Mounted Defi Advance ZD!!

Not too long ago, we were contacted by Mike Bratcher of Riseful. He was really interested in Defi’s Advance ZD unit as a solution for metering his engine without the clutter of gauge dials mounted on and around his dash.

He later followed up with us, wanting to order more Advance ZD units, and it seemed that it was because of his unique mounting solution on his NSX that it generated some buzz.

As mentioned earlier, Mike wanted to eliminate a cluster of gauges on his dash, preferring to keep with his car’s subtle interior design cues. His solution? Mounting the Advance ZD where the stereo screen. This of course meant the removal of his stereo screen, but since his died out, it made a perfect location for his custom mounting idea.

Here are some pictures that Mr. Bratcher shared on NSXprime.com:


IMG_5118_zps48yz4d15

346B7117_zpsds9rqhkp

346B7104_zpsputykqeh

346B7098_zpsooqb99ak


A very well excecuted job, Mr. Bratcher!!!

Interested in mouting your Advance ZD in similar fashion? Mr. Bratched seems to have documented this installation pretty well on NSXprime. Check out his post!