It’s a matter of fact that nearly all industries are being faced with several problems ever since the start of the COVID-19 pandemic. Whether it is delays in receiving goods, orders having to be cancelled due to unknown ETA’s, or price increases for raw materials or freight (which is a big one), we’re all experiencing the effects.
We’ve done our best to be on top of our inventory, but clearly the pandemic caught all of us off-guard. Not only that, but due to mandatory business shutdowns in efforts to slow the spread of COVID-19, it has put some of TEIN’s materials suppliers behind on manufacturing and, in turn, has put us behind on manufacturing.
TEIN Japan and TEIN China facilities were back to running nearly non-stop just to keep up with demands, and even with price increase on raw materials and freight, we’ve decided to hold off on passing the expenses down to you, our customer. But even then, this isn’t without it’s hiccups.
Again, I mention freight being a big factor in slowing us down. Not just the importation of our goods from Japan and China, but all intermodal freight. It seems that either there isn’t enough manpower for the day-to-day operations, or these freight forwarders are also facing severe pricing increases, such as fuel and operational costs, that cause companies to halt shipments. Everything is being affected.
This isn’t a post regarding bad news of a price increase. Rather, it’s a post to let you, our patient customers, know that we’re doing everything possible to try to get the products to you as soon as is humanly possible. So, we ask kindly that you please hang on just a bit longer, and know that we, as well as our authorized dealers and distributors, are doing the best they can to get you the products you want.
Here are some lovely pictures from the past couple of months of how the Port of Long Beach looks, with container ship after container ship just anchored out at sea.
Out there, in that mass of over 100 ships, are a few of our containers awaiting to be unloaded. Hang in there, guys. We’ll get our hands on your products soon.
Alright, so plenty of you may still have a lot of time on your hands due to being stuck at home due to COVID-19, even though our country seems to be opening up to business as usual. But still, it is forcing many “non-essential” (man, that really doesn’t sound nice) businesses to remain closed, and many of you without much to do.
This really has led to a lot of our customers taking the time to do some vehicle maintenance, which is great since we highly recommend you check your suspension.
As we have mentioned in the past, we recommend periodic inspections of your coilovers. For customers in drier climates, typically twice a year is good. While areas in cold or very wet areas should inspect at least 4 times out of the year, or at least after the wet season.
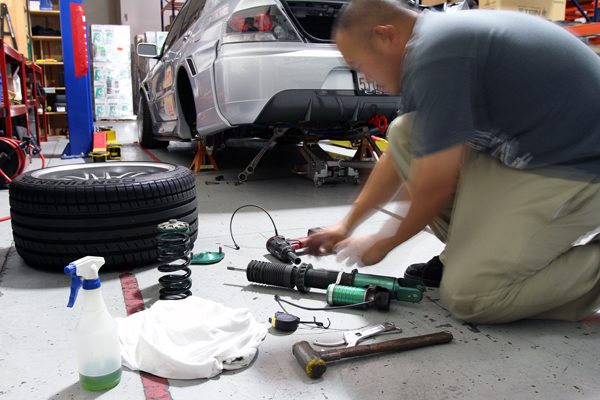
Getting chance to fully disassemble your suspension would be great. This lets you get to all the individual components- bare shock absorber, spring seats/seat locks, springs, upper mount, dust boots, bump stops, eye ring bushings, pillowball mounts, etc. and give them a good cleaning, or replacement if necessary. Sounds like a lot of work, which it is. But for some of us, this can be a rewarding task and help keep your vehicle road-worthy.
With an adjustable suspension kit, so many movable/removable parts should be checked, like spring seats and seat locks- making sure they’re able to move freely on the threads and also finally torqued to specification. Making sure the threads on the damper bodies are clear of debris prevents the spring seats/seat locks from seizing in place. Some consumers believe that because we use aluminum spring seats/seat locks on a steel threaded body will lead to them seizing because they’re two dissimilar materials (galvanic corrosion). However, that is not the case. Our aluminum spring seats and seat locks are hard anodized (forming aluminum oxide on the surface), and our threaded damper bodies are either chrome plated (older models) or coated with our ZT coating (and based coated with zinc). This will prevent potential issues with galvanic corrosion. So, please check to make sure the threads of the damper body, as well as the spring seat/seat locks are clean. Lastly, a little bit of lubricant on the threads is actually important, not just to prevent seizing, but to allow proper torque application when tightening. Anything from a light distillate (WD-40 is very common and readily available), or even a little bit of oil, will work just fine.
Even with that said, wet/coastal areas, or areas with snowfall will require a bit more maintenance, and actual cleaning of threaded components, as salts can eat away at aluminum and steel, and even cause the metal surfaces to expand slightly causing seized seat locks. You can use car wash detergents to clean these threads, and dampers in general. Again, even WD-40, which will displace water and lightly lubricate components, works well (we’d just apply this after any type of cleaning you do).
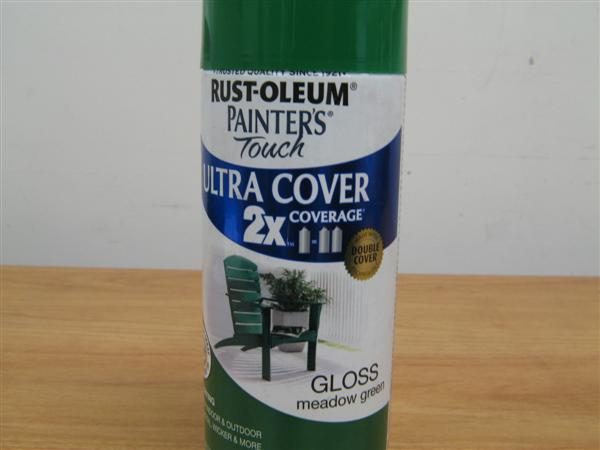
Also, it’s a good time to check the overall condition of your coilovers coated (painted) surfaces and making sure there is no peeling, scratched off surfaces, etc. For our green powder paint, customers can touch up surface blemishes with spray paints that are commercially available (Krylon or Rustoleum enamel; Meadow Green paint color).
A full disassembly lets you assess the condition of all individual components for your coilover and check if any part needs replacement. Also lets you give it a good detailed cleaning.
Lastly, and as a note for you TEIN suspension owners, if you need any assistance with your suspension or need replacement parts, or need the torque specifications for coilover kit, give us a call at 562-861-9161 Monday-Friday (9a-6p PST), or email us at tus_sales@tein.com. We’re open during this time, and we’ll do our best to help you out!
There seems to be a lot of misunderstandings when it comes to warranties and what we cover as a manufacturer’s defect. So, in case we’ve not yet covered that clearly enough. Let’s just go over some repetitive claims we get.
Now, let me preface this by saying that we’re not claiming to have defect-free products, or that there is no chance our product may prematurely fail. However, we’ve taken extra steps during the manufacturing process of our suspension kits to do our best to ensure the installation and use is problem-free for the end-user.
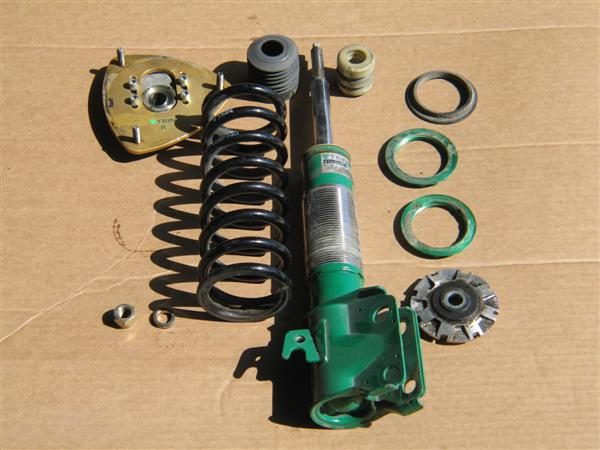
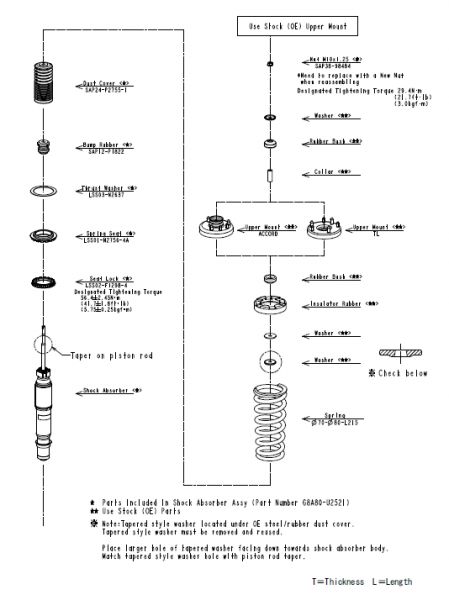
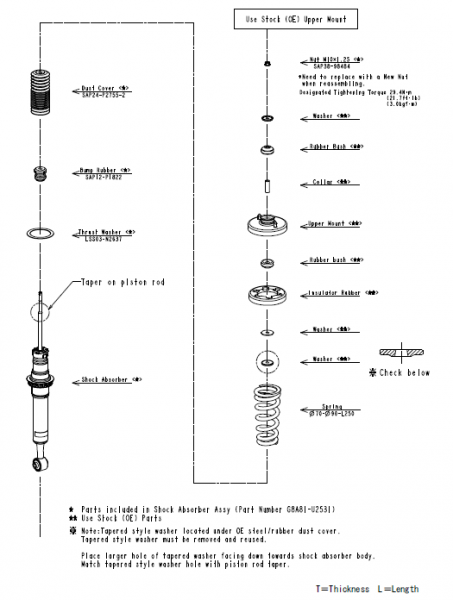
With that said, we seem to run into several issues, especially lately, where our products were not installed correctly, especially with kits that require the use of OEM components like upper mounts. I’ll show an example of a kit that uses OEM upper mount parts on a STREET BASIS Z coilover GSA80-8USS2 (2003-2007 Honda Accord, 2004-2008 Acura TL):
The above pictures are actually from our installation manual for this particular kit. If you notice, we mark some of the items with one star and some with two stars.
One star items are what is included with the coilover kit, while two star items are what are OEM components (not included with the coilover kit).
*The spring isn’t labeled with one star because it’s not part of the part number one star part number if you need to purchase a replacement damper.
But more importantly, these two pictures show the order of parts when installing. Just follow the dotted line from either end until you get to the other end.
Why I’m showing this specific example is because there are a lot of suspensions that use an OEM upper mount of similar design, and quite often we get calls from customers that claim that the piston rod is moving around inside the upper mount, or the piston rod shot so far up that it dented their hood.
Well, that’s because of an installation/assembly error. If the piston rod hit your hood, you’re missing a washer or washers that sit on the piston rod, either sitting on a c-clip or on the tapered end. See the circled washer in both photos? This one shows a slightly blown-up image of it showing which way the tapered hole is to go onto the piston rod.
That tapered hole will sit on the tapered end of the piston rod. In other words, it’s like a wedge fit. And this is important, not simply due to the interference of the two tapers, but because the washer/s allow the upper mount to be securely tightened to the piston rod.
Likewise, components like the collar, and the bushing and washer above the upper mount are just as important. Without the collar, the piston rod will have too much slop inside the mount. without the upper bushing the piston rod can move around and could basically grind itself against the upper mount and break . But without the top washer, the piston rod could potentially come out of the bottom whenever the shock is fully extended downward.
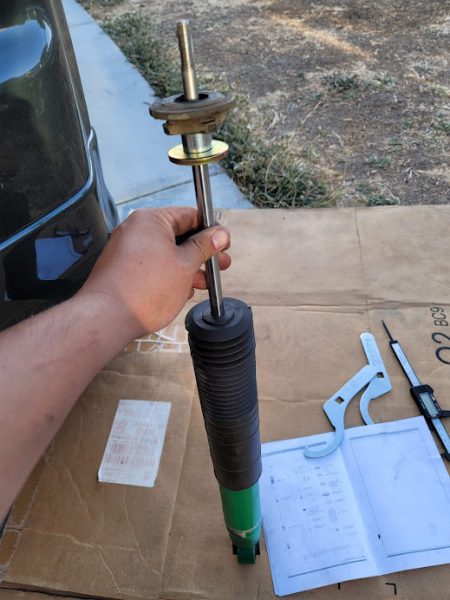
Here’s another example that uses OEM mounts, but for a rear shock that is separate from the spring). This picture is from the customer. They complained of clunking noises at any speed and that they piston rod had noticeable movement even when tightened down. They also supplied a video to show what they were talking about.
The picture obviously doesn’t show the whole mount assembly, but this was what the customer showed as being complete for the under-chassis mount setup.
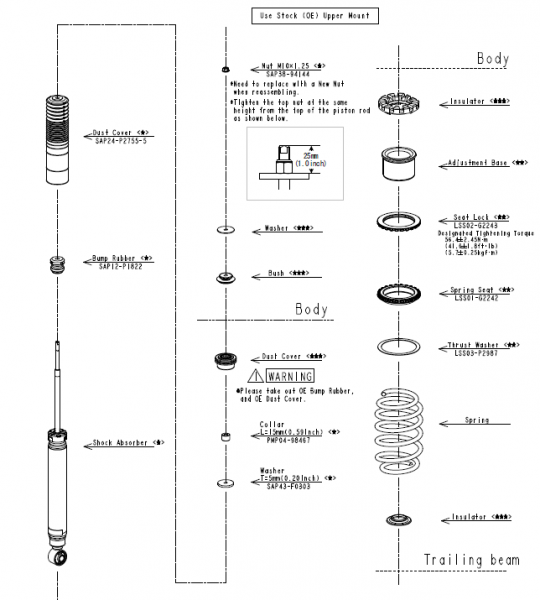
A look at the installation manual for this customer’s kit shows that the rear shock requires an OEM Dust Cover to be installed, and also notes to remove the OEM Bump Rubber and Dust Cover. The OEM Dust Cover is used in conjunction with our included collar and bump stopper.
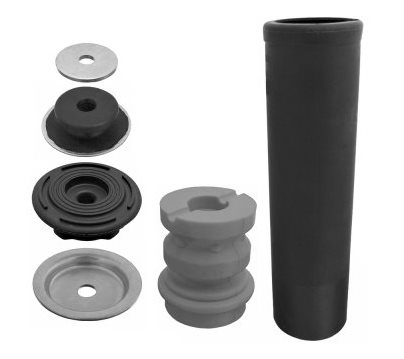
Here’s a picture of an aftermarket replacement Dust Cover you can purchase online for the same vehicle as the customer’s. Here, from right to left & bottom to top, it shows the OEM (or OEM style) parts- dust cover, bump stop, metal stopper, rubber insulator, and upper parts- rear suspension support (as the OEM refers to it) and washer. The customer only shows the rubber insulator. So, they’re missing the metal stopper (shown on the bottom left of the photo above).
Without the metal stopper, the shock is relying on the rubber insulator to be held to the shock tower. On droop (extension) that may seem fine. But on compression, it is not enough to hold the piston shaft securely to the shock tower.
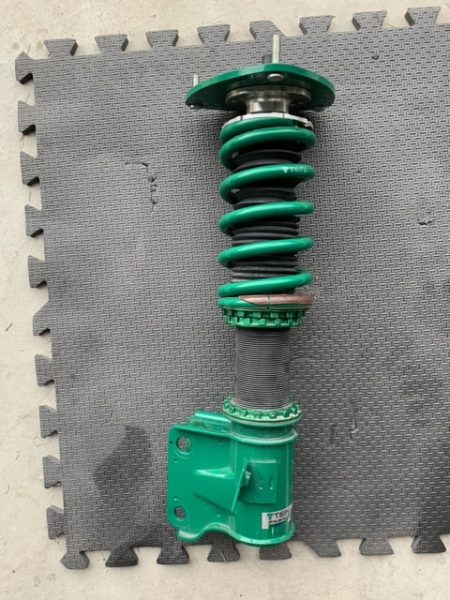
But, such concerns are not just limited to OEM upper mount assembling, nor is it unique to just these coilovers. We also have had calls or emails related to coilovers like our FLEX Z line.
Coilovers that utilize pillowball upper mounts for strut type suspension also have some small components. Most notable is a collar that is placed between the upper spring seat and the spherical bearing (pillowball). This collar, about 6mm thick, allows the strut to pivot a few degrees to be able to articulate its motion (camber and caster prevent the strut from being perpendicular to the upper mount), and with front strut suspensions, you’ll need this articulation as you steer as camber and caster change when doing so.
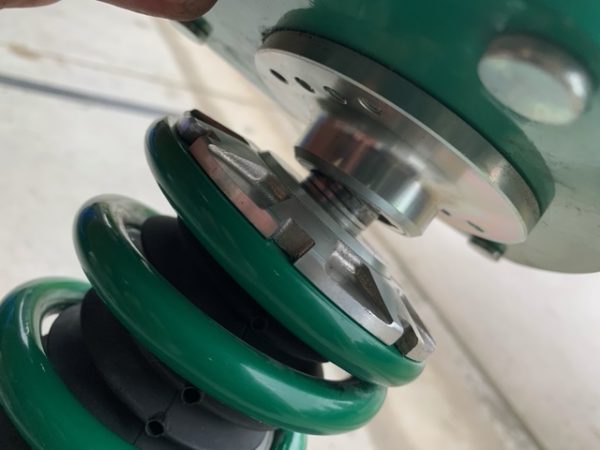
We’ve also received a few calls or emails where a customer states their FLEX Z has a strange grinding noise or popping noise while turning. After getting a bit of information and some pictures from the customers, they show a spring seat sitting right against the pillowball mount, missing this 6mm collar. If you can picture what this does- the strut is now completely perpendicular to the upper mount. But again, the mounting point, as well as the relative camber and caster angle for the upright/knuckle, never have these two components been completely perpendicular. That means that there is an incredible amount of force on the piston rod, basically forcing it in angular motions. That could lead to the piston rod snapping, specifically near where the piston rod is threaded to mount to the upper mount. Not only that. If you’re lucky enough to not have a snapped piston rod, the upper spring seat will be grinding against the pillowball stopper under the mount, which is where the grinding and popping noise comes from.
The coilover picture above may look okay to most, but to us we can tell that a critical component is missing between the upper spring seat and the upper mount. The upper mount is sitting completely perpendicular to the upper spring seat.
But this one, which was the customer’s coilover for the opposing side, has the collar in place, which is why you can see that the mount is free to pivot a few degrees.
You can tell that without this collar (6mm thick), the mount would sit right against the upper spring seat. That’s a no-no, and the upper spring seat will end up grinding against the upper mount whenever you steer.
Of course, many times, the customer will state we didn’t include the collar, or whatever critical component, when they received the kit. We don’t want to say the customer’s wrong, but unfortunately they are- all suspension kits go through a function check and parts check at the factory prior to being packaged up and sent out. For a pillowball strut type mount, it’s a matter of making sure the mount can pivot a few degrees in various directions. We’re very adamant about this step being checked during assembly.
We’re not saying we’re perfect, but we definitely try to be. A suspension purchase is a big investment for a lot of you. We’re not trying to make your purchase and installation difficult. In fact, ultimately we’re trying to make our suspension as easy to install and as affordable an install as possible.
Anyway, we just want you to make sure you see our install manual and read it thoroughly. We completely understand if this is your first time ever taking on a performance suspension install, and we of course will always be within reach to assist you with installation over the phone or by email. Take your time and make sure you do it right.