Recently it seems that many Overhaul customers whom have sent in their dampers for service have been under the assumption that the overhaul repair base price includes any other parts which may be needed or replaced. However, this is not correct.
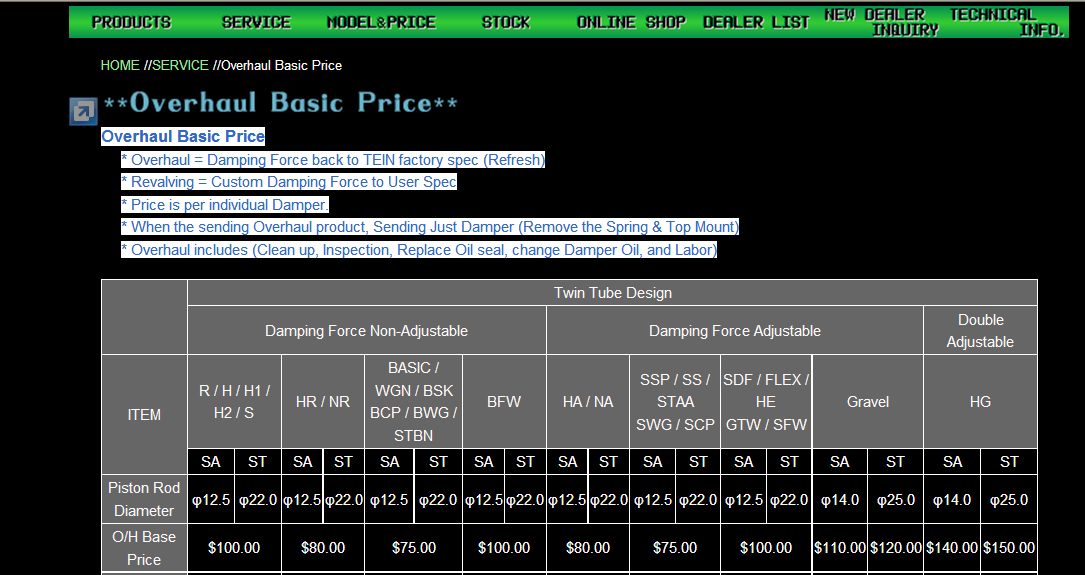
As an example, I will use the Super Street coilover overhaul base price. The base cost for the repairs, which includes damper oil, seals, nitrogen gas recharge, o-rings, and overhaul labor is $75.00 per damper. This service does not include (should they be required) any other internal or external components such as piston rod, piston valve, bump stop, dust boot, etc.
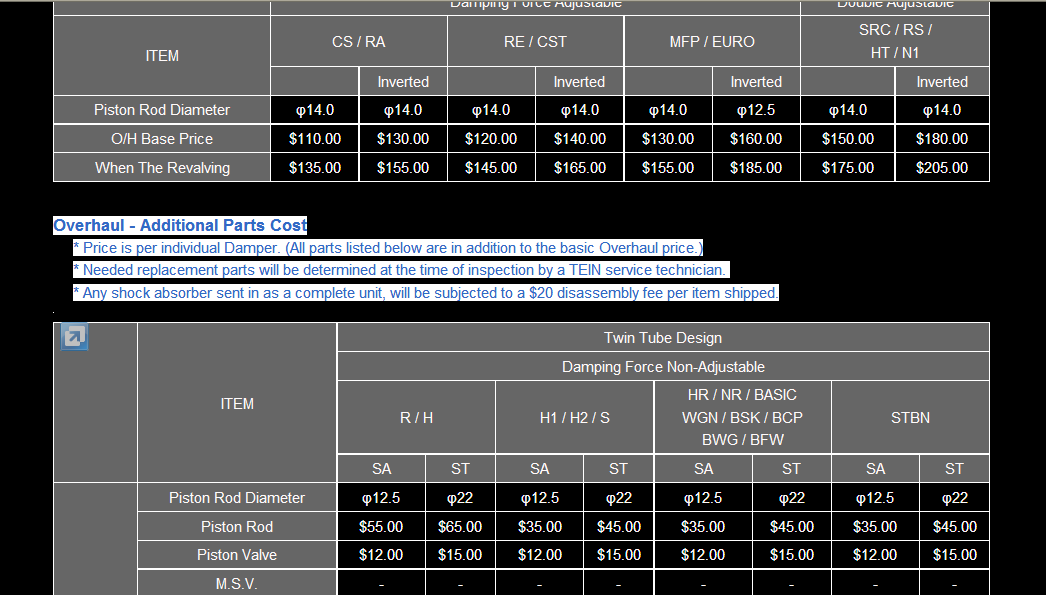
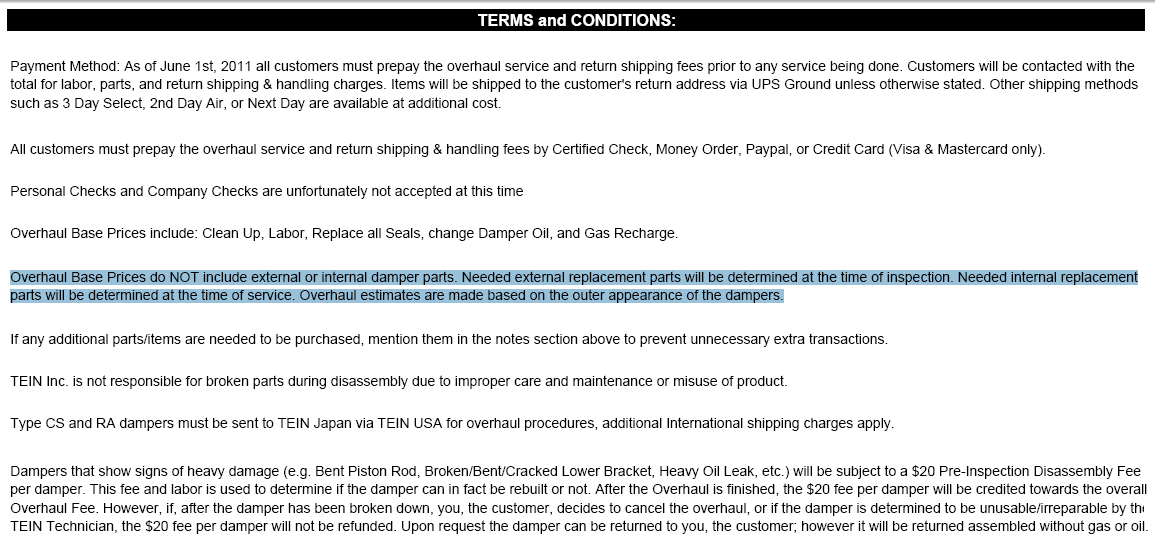
The area highlighted in white and blue on all three images shown below detail this info.
A few customers have claimed to have been told over the phone by a TEIN Staff that the total cost to repair one damper would be our listed base prices (ex. Super Street $75/ HA $80/ Type Flex $100) and would include extra parts, which is incorrect. These notes are also detailed on our overhaul agreement form which is the customer is to fill in and sign agreeing upon the terms of the service, and sent in with the dampers.
We would just like to bring this to everyone’s attention as to try and avoid any future confusion as well as show everyone that we do express the possibililty of extra charges for the service on top of the standard overhaul service.
Hey Everyone! Back again with some more tech tips which hopefully help out with you TEIN coilover systems.
Generally around this time of the year we receive many TEIN dampers sent in for our overhaul service. Most customers are looking to do a base repair and possibly consider some replacement parts for the dampers.
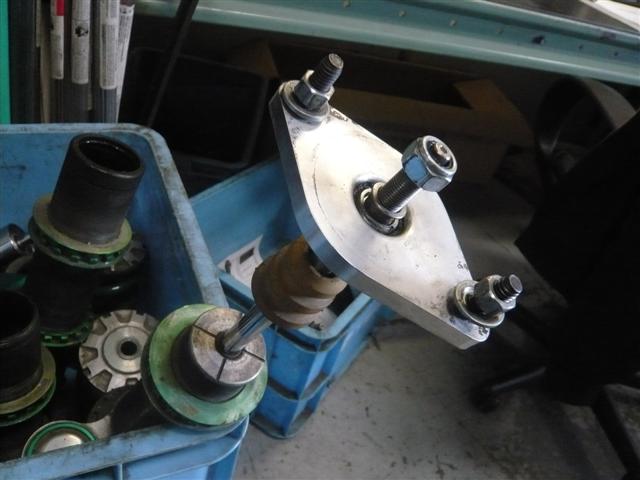
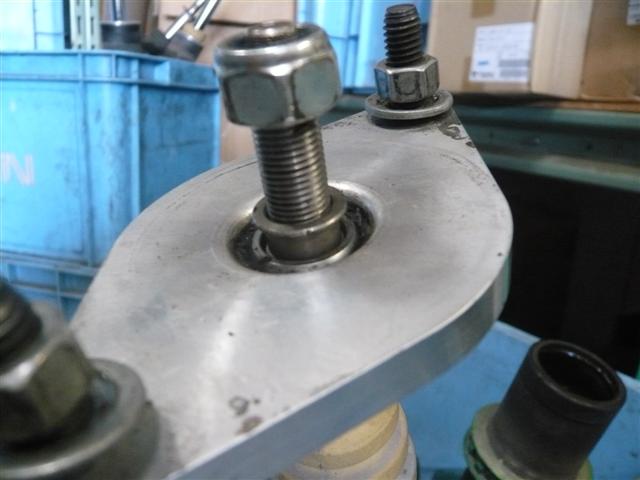
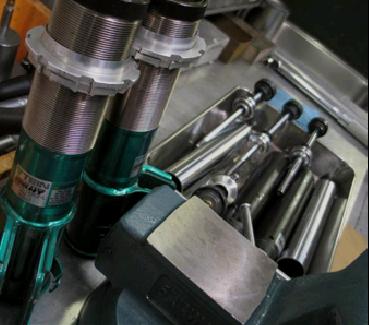
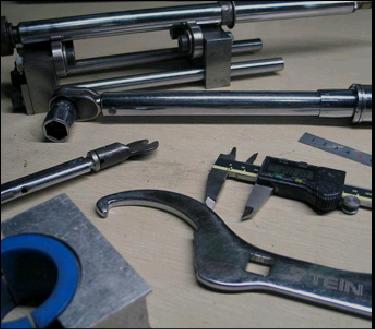
However, some times the parts they are looking for may not exactly be a TEIN part. Some coilover kits we offer at times may not come with the pillowball uppermount as a feature desired and the customer decided to look elsewhere for a mount that they can adapt to the coilover system. Although some companies do claim that their pillow mounts would work with multiple manufacturers, the possiblilty of a misinstallation is still there, as you can see from the attached photos.
Most pillow mounts offered utilize the following components:
1) A design-specific lower collar or washer which the bottom of the mount would sit against on the damper piston shaft.
2) A collar or pillow nut (Pillow nuts commonly used on Macpherson strut type dampers) used above the mount to center and maintain the mount bearing to the piston shaft.
3) A top nut (Commonly used on Multi-link type dampers) to secure the mount to the piston shaft.
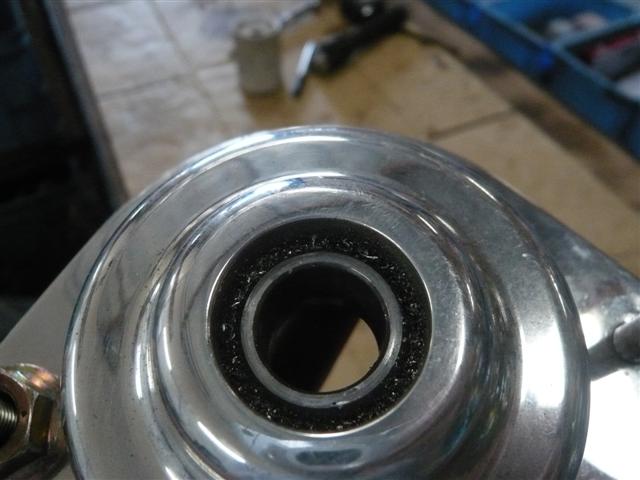
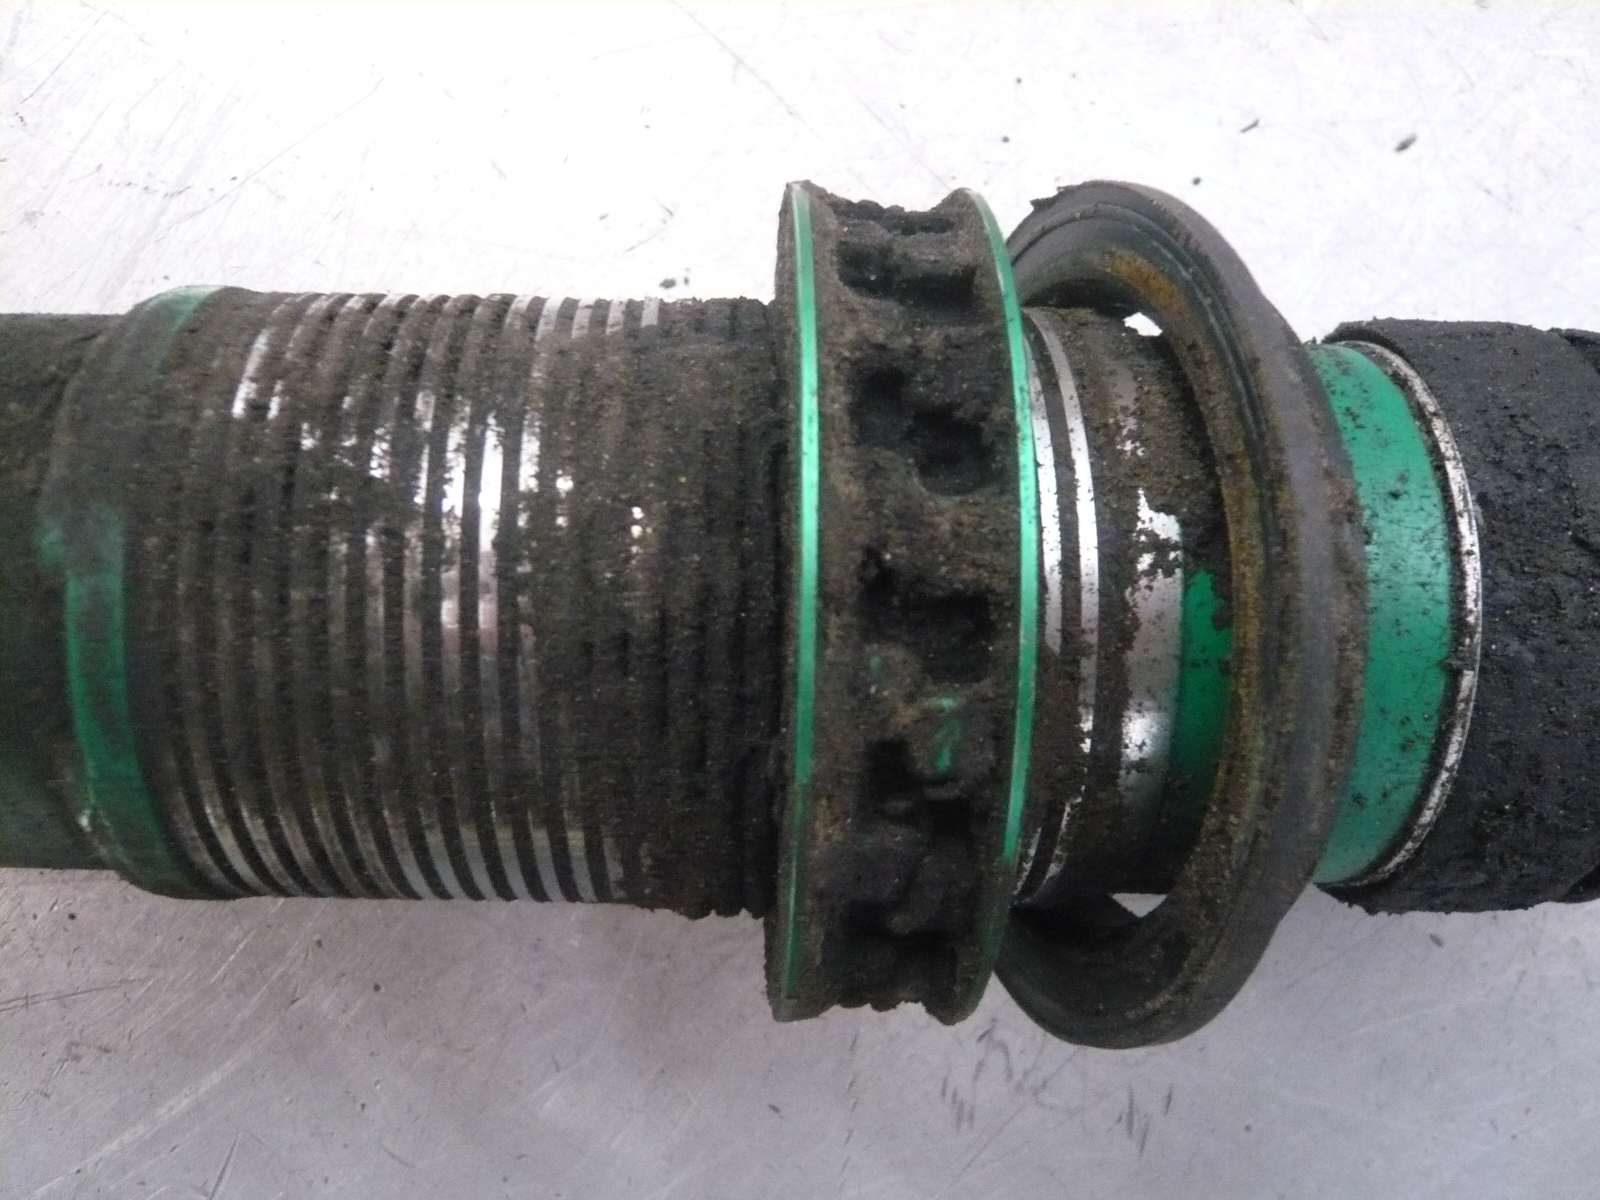
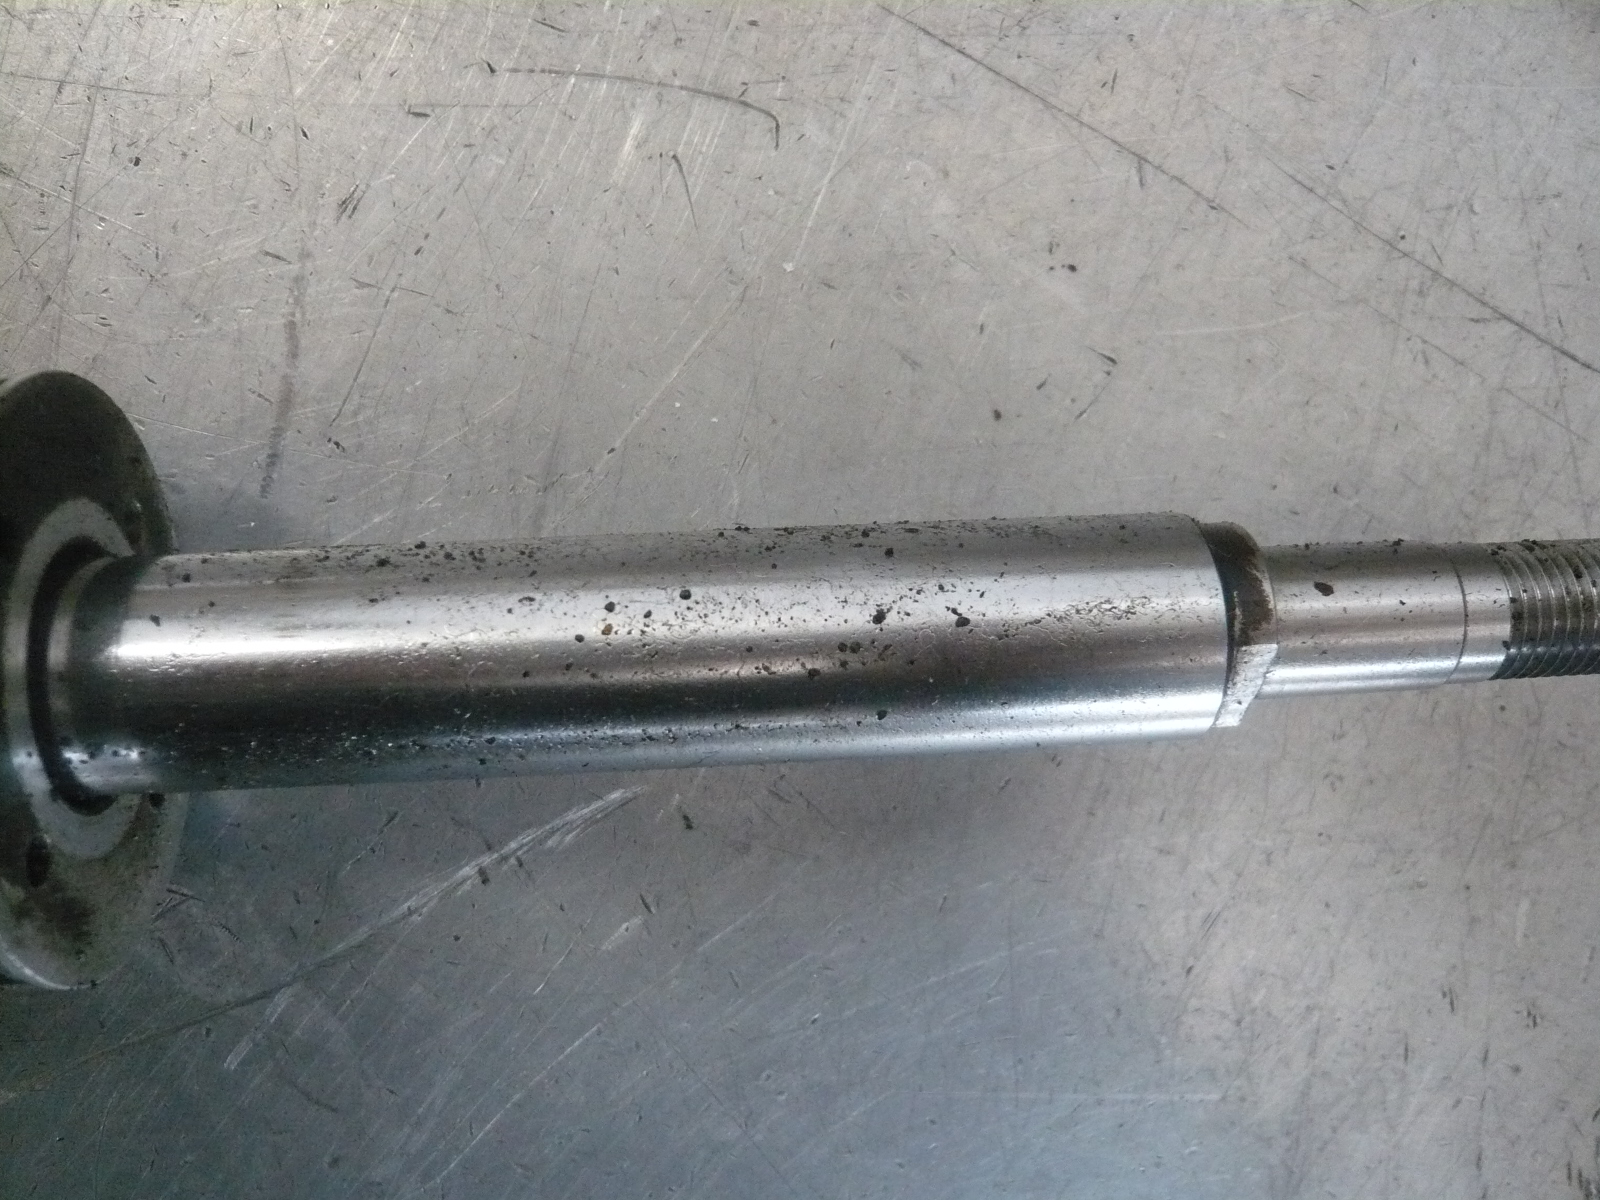
Even if used on the dampers it may not be the correct type/design for the piston shaft causing the mount to be loose creating noise during normal operation and/or odd wear to the the piston shaft surface which can eventually lead to a break on the shaft, or can even catastrophic internal damages due to a design flaw which would allow the component to bypass the bump stop and max out the damper stroke.
All of these situations can definitely take a bit out of you wallet and give you a bad headache. With the details and photos shown, I do caution anyone who does consider mix-n-matching coilover system components. Make sure that fitment is solid, and check the fitment if any noises are heard And if multiple collars are required to properly mount, you may want to consider not using the mounts and whether going with another type or just sticking with the coilover manufacturers recommendations. It would save you time, money, and a bad headache.
We know the purchase of coil-over kits can be an expensive investment, whether you’re buying our product line or a competitor’s. Some have to save up for the purchase while others can buy at their leisure. Nevertheless, maintaining your investment should never be overlooked.
Dirt and debris can potentially be caught in between the seat lock and threads. This can cause the seat locks to “Freeze” if you will, making it very difficult to remove or adjust your ride height. Even worse, dirt/debris can get caught in between the piston rod and seal prematurely damaging the damper(s). The seal will then eventually tear, causing the gas and oil to be released, making the damper(s) unusable and you as a customer very upset and irritated.
We recommend our coil-over systems to be periodically cleaned. You can hose down the dampers or put some love and elbow grease in to it and really detail them. Particularly focus on the piston rod and threads on the shock body. We also recommend to overhaul your damper(s) every 35,000 miles or three years. The internal gas, oil, and seals will be replaced. Doing so will prolong the life span of the dampers.
Keep in mind that upgrading your suspension and not maintaining it is like buying a new Porsche and never washing it. Or getting a new paint job and not waxing it. I can go on and on with similarities.
With that said,……Save your self a headache and clean your darn suspension!!!
Oh, and of course, if you have any questions regarding overhauls, please feel free to shoot over an inquiry to tus_sales@tein.com!
When it comes to overhauls I’m usually the person in charge of carrying out all the steps. Except for one which is the most important of them all , the actual repair. The way it works is as followed- We receive the package and check it in then we move it to our R&D department for a repair inspection. Upon the inspection I contact the customer and secure the repair payment and/or final overhaul decision. Upon completion of repair a recontact the customer to verify shipping information and that’s where it ends.
The disassembling of our dampers is not that difficult. Breaking down the piston rod and internal components, then cleaning them from dirt, dust, rust, and debris is also not that difficult. It does, however, get a little repetitive. Now, where it gets tricky is reassembling the internal components. As some of the parts (shims) tend to look the same but are nevertheless different in design and thickness. There are many steps that need to be done to successfully overhaul a damper. I will save the details as they are confidential but I must say that re-greasing, and re-torquing all the components is the easiest step of all.
Well, now I have actually learned the repair process. Unfortunately for us here at TEIN one of our R&D staff members has left us to work as a CHP officer. Fortunately for me, I have now learned a new skill and got my hands on repair action. We’ll still leave that work for our trained engineers. As for me, I’m glad I’ve been able to learn more of the details that goes into an overhaul.
It’s no secret that since the beginning of time consumers of products have been attempting DIY fixes in order to cut down on repair costs. Some succeed while others fail at actually repairing whatever it is they want to fix. More often than not, for those who do fail, the repair costs end up exceeding what they could have been had the product been sent in before it was tinkered with.
Our products are no different. A few times out of the month we will receive a product that has had a “home remedy”, a DIY fix attempt. Well, we’re here to tell you this: “Don’t DIY your own repairs!” The end result might turn into a much more costly mistake.
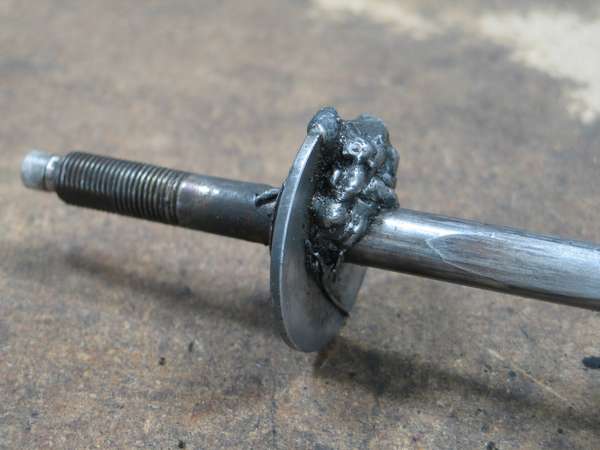
We will take this customer for instance.
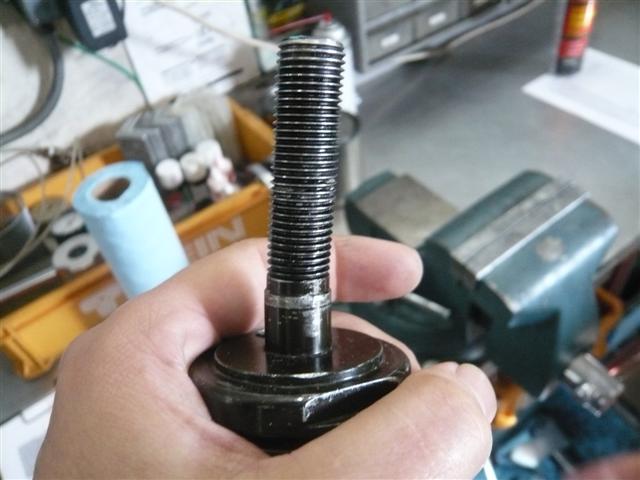
(Depending on your vehicle and model your dampers’ components may or may not look the same.)
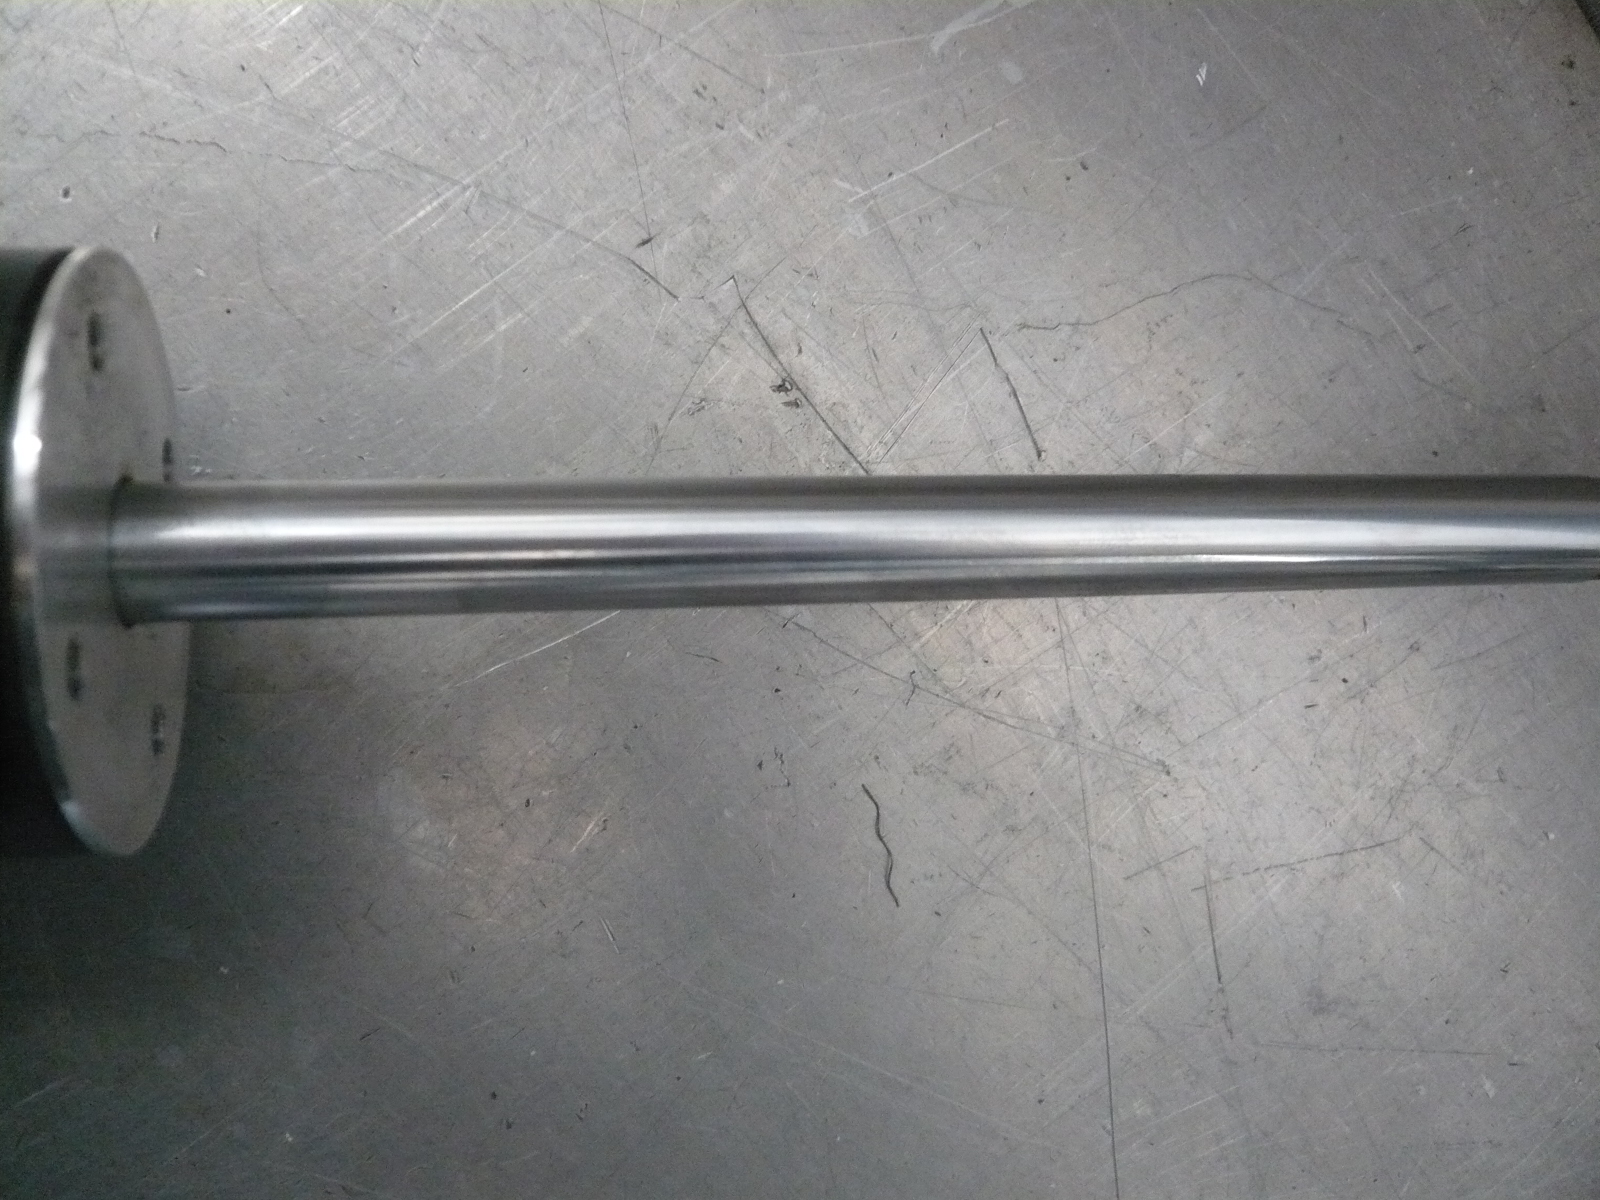
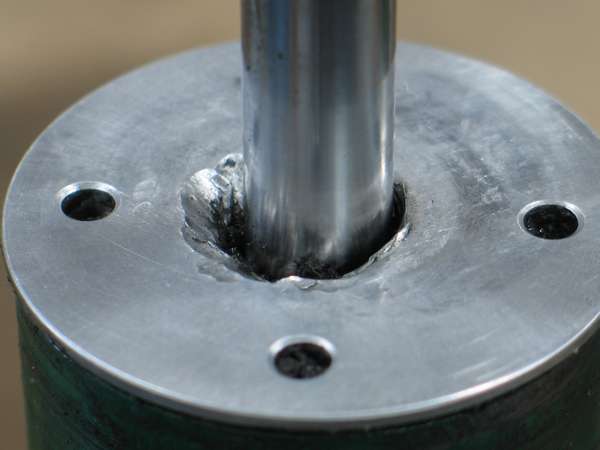
For a reason that we were unable to figure out, the customer decided to weld the Bump Stopper to the Piston Rod.
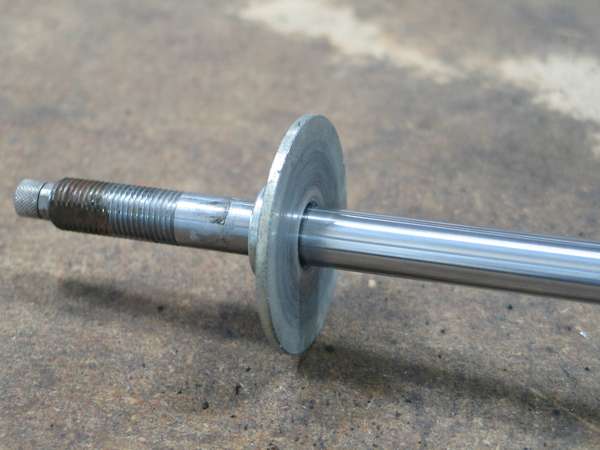
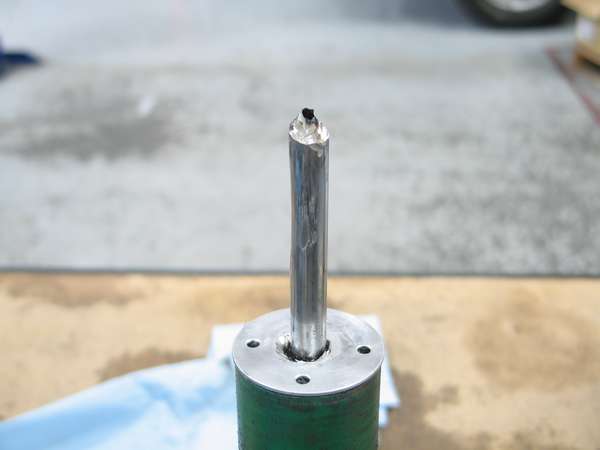
A normal Bump Stopper on a Piston Rod without the welding.
The customer’s original issue may have been fixed. However, that’s where the list of pros to doing it themselves ends.
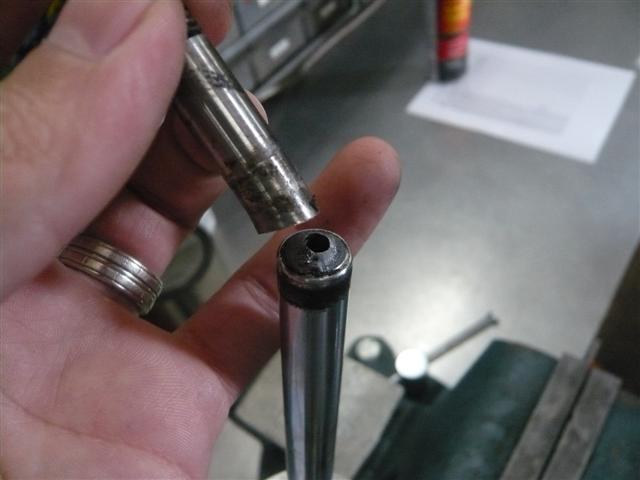
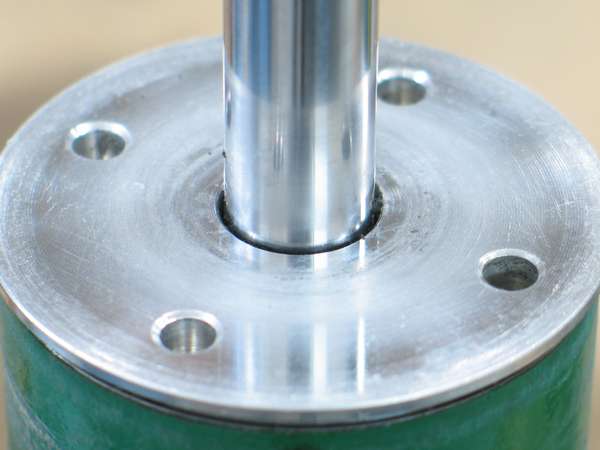
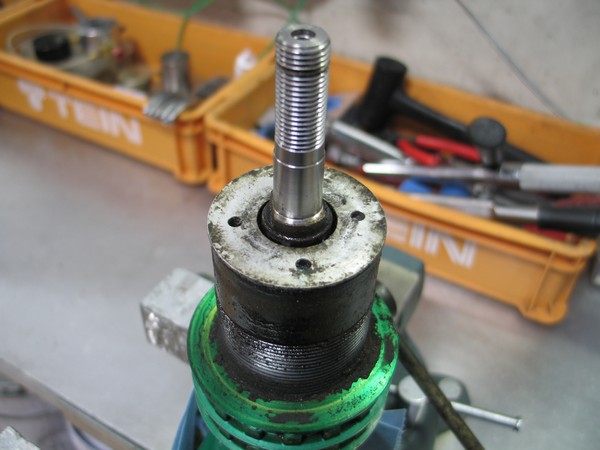
Here’s what the Ring Nut (top of the shock) will look like under normal conditions.
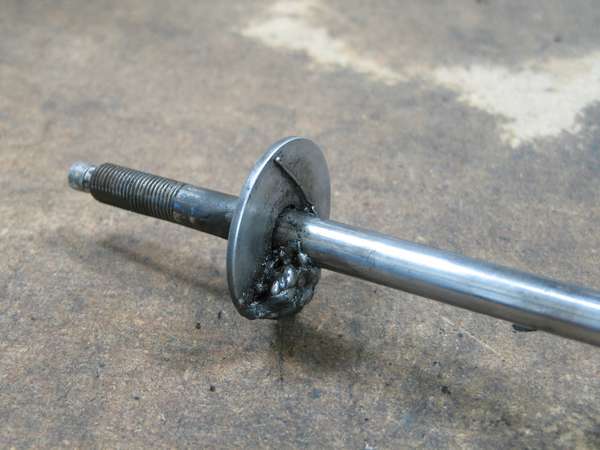
Here’s how the customer’s Ring Nut ended up looking after the damper parts were welded on and the damper was actually driven on.
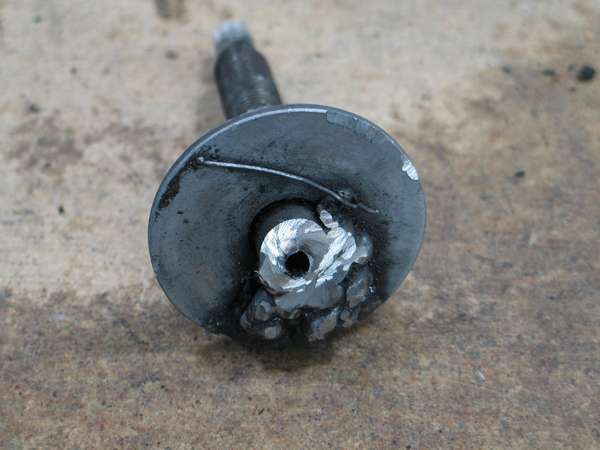
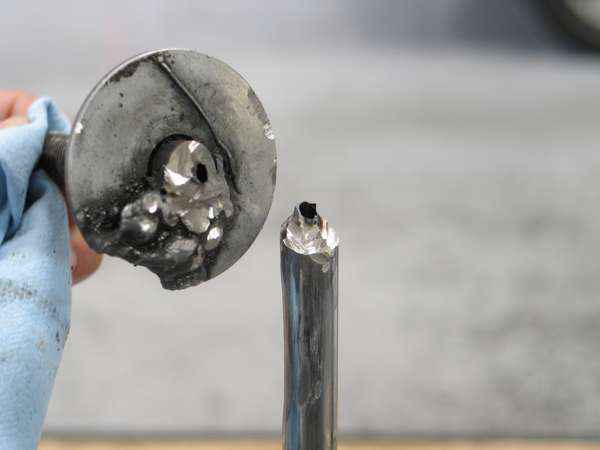
Because the Bump Stopper could not be removed in the correct manner to make way for servicing of the damper, the top of the Piston Rod had to be cut off.
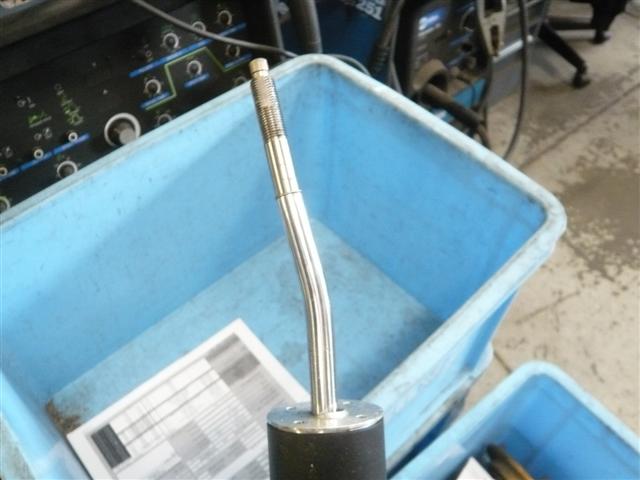
This customer was lucky that the damage was limited to that location on the damper only, and that an overhaul was still possible.
But the labor put into the cutting and the cost of the replacement parts that were needed could have been avoided had the customer sent in their damper without the DIY fix that was attempted.
Your DIY fix may not end up as lucky, you may end up damaging the damper beyond any repair.
If you think you can fix an issue that you’re having with your dampers, take a step back and think if the possible extra cost of repairing your “fix” will be worth it.
By the way- if you aren’t sure you have your suspension set up correctly, or you just need to verify the parts of your kit are correct, we ask that you please contact us beforehand and have us assist you with your inquiry. Give us a call at 562-861-9161 or email us at tus_sales@tein.com for assistance.
As we previously mentioned, the Sparco Rally xD team had a rear twist beam axle failure during the last event, Susquehannock Trail Rally in PA. Once they got the car back down to California, they dropped off the rear dampers to us for inspection/repair.
Like we stated before, we knew that the dampers had some damage and broke the piston shafts. Here’s a look at the carnage
Remote hose was ripped right off. The shell case took a few hard impacts causing some dents. Now onto the piston shafts
The above picture shows the top of the shell case where the ring nut seals off the damper. The piston shaft broke midway and the remaining pieces recessed into the damper with oil coming out this ring nut portion. The top portion of the piston shaft was still attached to the shock tower.
This pic below shows the piston shaft broken towards the top, snapping right off after the twist beam axle gave way.
But after a full teardown, we saw that the inner tube (where the piston is inside of) was still intact. The outer shell case took a hit, but the inner tube was unscathed during this violent axle breakage. Here’s a pic showing the dent
The second pic from the top shows the other indentation on the shell case.
On a mono tube damper, this wouldn’t fare so well with that type of dent. Since the piston would reside right against the inner lining of the shell case of a mono tube damper any imperfection to the case will make it either impossible to function properly, or to be field stripped, or both. This is what I meant as testament to the durability of the twin tube damper structure and this case shows it well!
If you’re wondering why we would make a twin tube damper for a rally car, there’s a bit more to it than just the damage that could be inflicted to it physically. Our HG twin tube structure isn’t like a normal damper.
In a standard twin tube damper, there is still an inner tube that contains the piston shaft and piston. This area is fully submersed in damper oil. From the bottom of the damper and through the base valve controlling oil flow into the outside of the inner tube (inside of the shell case) is where there is some oil and the nitrogen gas charge. This charge is important in sufficiently providing rebound force to the damper.
What we do with the HG is fill the inner and outer tube with damper oil.
But wait. If you fill a damper full of incompressible oil and no compressible gas like nitrogen, then technically the piston shaft will never recess into the damper and it wouldn’t function at all.
That is true. But this is also why we utilize an external reservoir to keep the nitrogen charge separate. With this, we can eliminate any chance of aeration (nitrogen gas mixing with damper oil, causing it to froth, decreasing damping effectiveness) while still being able to secure sufficient rebound. The twin tube structure also allows ample stroke length for a given shell case size compared to a similarly built mono tube damper.
So why not utilize this design into all rally suspension? Mono tube dampers still have many great benefits- they dissipate heat better; when inverted, they decrease unsprung weight (you can technically invert our HG damper, btw); they allow a larger piston size; overall damper oil volume can be much higher. They also allow for us to use our Group N.technologies, which aren’t readily applicable to twin tube dampers
But mono tube rally dampers are a much higher investment as development costs are quite high. Also, they are physically much larger in length and body diameter. the pistons used in them are much larger too, which is key for precise damping control.
So in the end, the HG is still very capable and also very durable at a much more reasonable price!
Anyway, enough ranting. We went right to work getting it rebuilt with new shafts and internal seals. this time, we stuck with our shorter length reservoir hose, still giving the team the freedom to reposition the external tank for their needs.
Awwww. Looking as spiffy as it will ever be! Ready for more abuse!!!
Speaking of which, here’s a video the Rally xD team posted from their blog showing the twist beam axle breakage
Now, I know we list an overhaul starting price on our website. However, we do know that some customers are a little confused when we give them a quote higher than what they may find listed. I’m hoping to clarify on this matter a little bit.
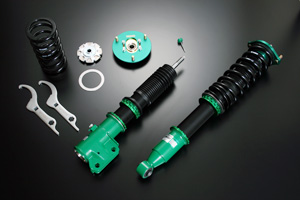
On our Service page on www.tein.com, you will find a link to our Overhaul Price List. You can find a list just like the above image which is the starting price for our overhaul service, as well as revalve service (if you plan on having the dampers matched to a specific spring rate). Again, this is just the starting price for the work covering new seals, damper fluid, nitrogen gas fill, and labor.
However when we receive your dampers, we have our in-house engineer inspect the dampers to assess any damage or potential damage from the original parts. As you can imagine, there are a lot of moving components that comprise the complete damper. In some cases, we can reuse many internal parts. But in the event that an engineer finds a part to be under specification, we will suggest to replace those items. If you’ve ever received a quote much higher than the starting price, it is because of these findings.
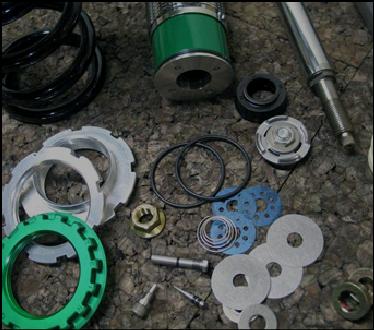
This picture shows what type of internal parts may need to be replaced for twin-tube type dampers (Basic, Super Street, Flex, Super Drift).
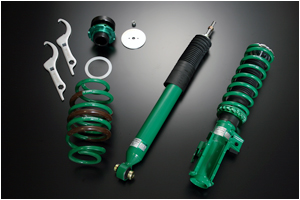
This list above is for mono tube damper-specific parts.
In all cases, our staff will go over the details with the customer to let them know what will possibly need to be replaced on the damper part by part. Again, we know that for some customers a high quote is not what they are expecting. We just take these extra steps before starting any work to make sure that the customer has an overhaul that is worthwhile and that will last just as long as an out-of-the-box kit.
*For the record, we’ve taken a customer’s request to reuse some of his old parts (a damaged piston shaft was one of them) when overhauling to save on some costs. The kit came back to us not too long after because the nitrogen charge ended up leaking out past the new seals.
So we will do whatever the customer requests, within reason. But believe me- we do so hesitantly.
We do, however, leave some new internal parts as only a recommendation to replace. But in many instances, it is probably best to take the engineer’s word when they suggest part replacement.
Of course, if you need some explanation or any assistance with your dampers you’re thinking of having serviced by us, please feel free to give our staff a call at 562-861-9161, and we will take the time to go over the service in detail for you.
Recently I have noticed that a lot of consumers and dealers of ours inquire about the differences between a Japanese-spec coilover kit and a U.S.-spec coilover kit. Relax, grab a cup of coffee, and let me do some explaining. It’s actually quite simple.
One of the main differences between these kits is the valving and in some cases spring rates. The U.S.-spec coilover kit comes with a more aggressive valving. The reason behind this is because consumers in the U.S. prefer a slightly more aggressive coilover in comparison to consumers in Japan. U.S. vehicle’s may also have some manufacturing differences opposed to the ones released overseas.
But as mentioned earlier, another factor is the spring rates. Some of the U.S.-spec coilover’s come with a stiffer spring to match the aggressive valving of the dampers. Of course there are other differences between the dampers besides the valving and spring rate. Damper designs may vary from U.S. to Japanese kits such as damper mounting points, damper body and stroke lengths, and required OEM parts.
As a side note- some U.S. applications may be compatible with Japanese dampers with no modifications whatsoever. But we recommended to verify with TEIN prior to purchasing these kits.
In conclusion, regardless if the coilover kit is Japanese or US spec they both come down to one thing- they both cater to different markets which is a matter of consumer preference. However, TEIN is able to assist with customization of your TEIN dampers through our Overhaul and Revalving service available Stateside through our in-house service departments in the East Coast and West Coast facilities. As a performance suspension manufacturer for a global market, we realize it is difficult to appease all customers. But we can definitely assist our customers in dialing in their suspension for their specific needs, all of which is for your driving pleasure!
Hello from the TEIN R&D Department. Some, if not most, of you own a set of our dampers. If it so happens that you do indeed own and use a set of Tein Dampers, sometime down the line the damper is going to need an overhaul.
Whether the damper is leaking or just not performing like it used to, we have all your Overhaul needs covered. Follow this link for some basic prices and information regarding your Overhaul Service.
Here, we’ll be using one of our Overhaul Customer’s dampers to show you what normally goes on during our Overhaul Service.
We can see that this customer’s damper has been leaking oil and has accumulated some dirt while being driven. (Remember everyone, check the conditions of your dampers often. If you see it beginning to leak send it in for servicing. Continued use of an already worn out damper can only do more harm.)
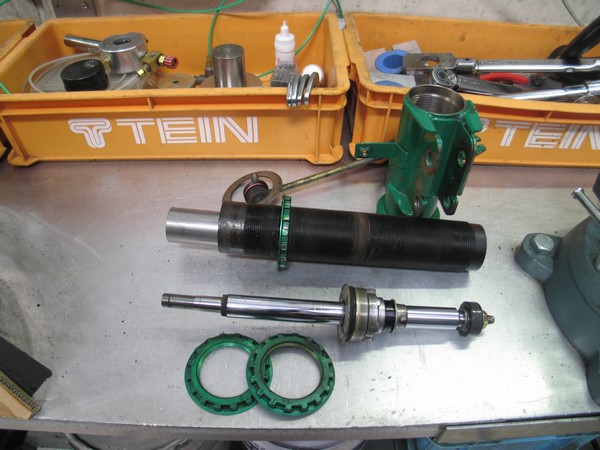
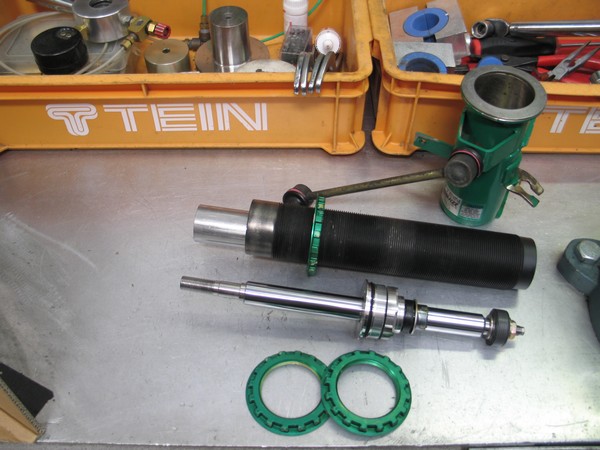
We’ve disassembled the damper and the parts are going to be washed.
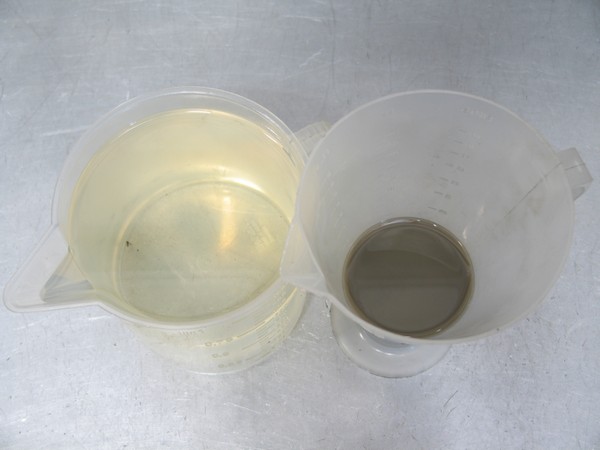
One of the easiest ways for us to determine how badly your dampers needed servicing is by looking at the overall color and quantity of the oil that comes out of the damper. The oil on the Left is new shock absorber oil, and the oil on the left is what came out of the damper, you can see the color difference between the two. When compared with the amount of oil the damper should have had, the actual amount that came out is quite low. (Driving a shock absorber with little to no oil will have the same consequences as driving your engine with no oil, inner components will begin to wear down and need replacing, or in the worst cases we’ve seen, the dampers are completely irreparable.)
After the parts are washed and inspected further, worn down parts will be replaced.
After everything is put back together you have a damper that performs just as it did out of the box and looks almost like it did out of the box. (Our dampers are originally powder coated. If the paint is beginning to fade or peel, to get it back to looking like brand new the damper would require a re-powder coating service. Unfortunately, we do not have that service available.)
Our recommended Overhaul Service interval is 3 Years/36,000 Miles if the damper is used only for daily driving/paved road use. If your dampers see track time or off-road time then your recommended Service Interval will be shorter. Vice versa if the dampers are used on a “Saturday Night or Weekend Special” car then your Service Interval will be longer.
Bottom line, check your dampers’ condition often. If you see oil or if they’re not performing like they used to then send them on in. We’ll make them look and feel like new.
Alright future TEIN service customers, just wanted to let everyone know about packing products which are being sent in for services to either TEIN East or West facilities. I’m one of the main staff members that checks in overhaul repairs and have came across some poorly packed packages. I would like to give everyone a few tips which could save you some headaches and money.
TIP #1 BOX SIZE and PACKING MATERIAL – Be careful with the box size and packing materials used to avoid any damaged product or package refusal. Be wary of the freight companies because once the package leaves your hands to when it arrives in ours we dont know what the package has gone through.
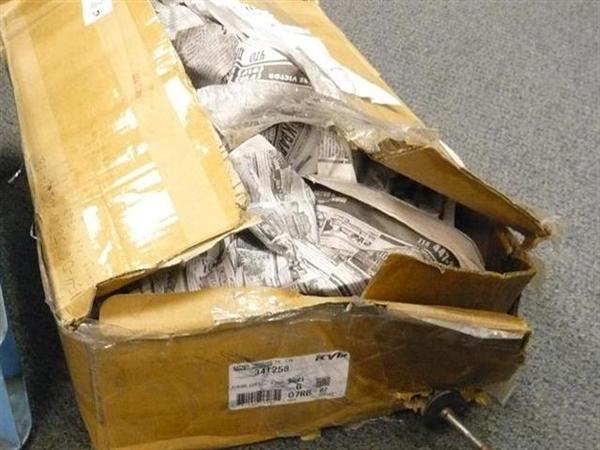
The product received here in this picture was a bit heavier then what the box could handle.
TIP #2 DO NOT COMPRESS THE DAMPER – Never try to use any type of hard wire cable or custom metal bracket to compress and hold in the piston rod of the damper to fit into a smaller size box as this could break free and tear through the box possibly create damage on the piston rod or any other pieces included in the package. Times are tough but not tough enough that you cant get a bigger box or pay the differnce in costs for using a bigger box.
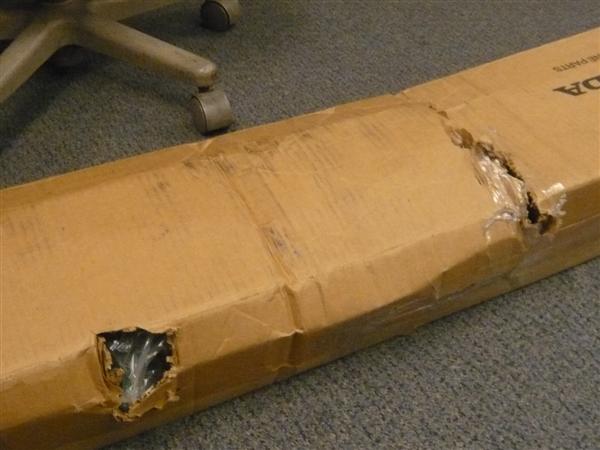
This package arrived open as shown in the photo. Because it was packed with newspaper it didn’t offer any cushioning or padding which burst through the box. When asked “What happened to the box?” the delivery driver claimed, ” That’s the way we got it.” This is a perfect example of a package that would be refused as we cannot know what was supposed to be in the box.
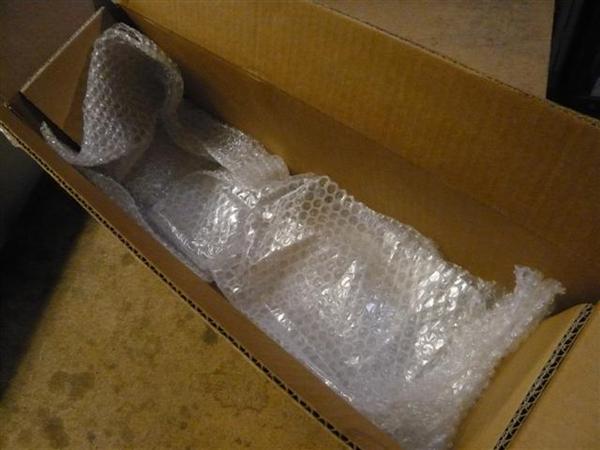
TIP #3 PROPER PACKING MATERIALS – Extra cardboard for more cushion or padding on top, bottom and all four sides is recommended. Packing peanuts, bubble wrap and foam packing are always good packing materials that can be used (Note: Newspaper is not a great choice of packing material).
The ends of the box where the piston rod rest is a great area to place extra padding or cardboard
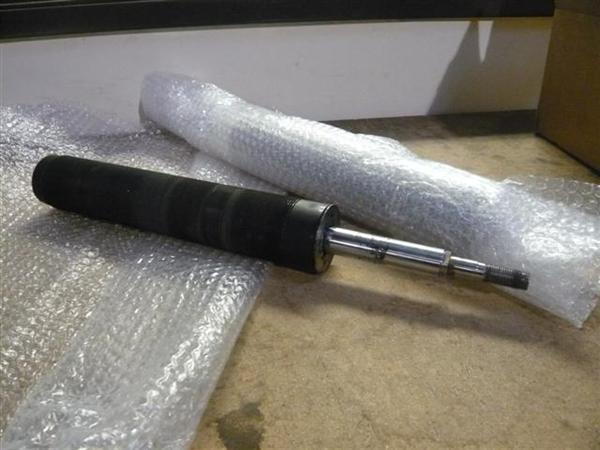
Bubble wrapping is a great way to add some more protection. Sending only what is needed for inspection or service will save money on shipping and reduce the chances for damage or loss during shipping.
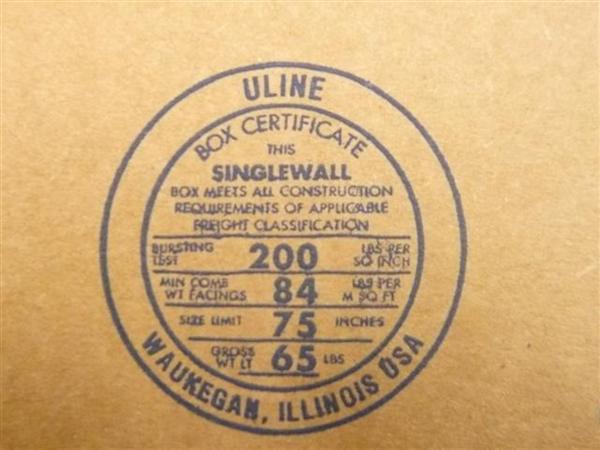
TIP #4 USE A SUITABLE BOX – Be sure prior to packing and sending out the repairs the box can handle the weight of the product being sent in. The boxes usually have a box certification detail marked at the bottom of the box with maximum weight, size limit, bursting test, etc….
Be careful with any boxes that may not provide those specifications as they may not be able to take the weight. Use these packing recommendations and you should be in great shape.
I hope you use my tips because I would hate to call and tell you that we did not receive all the parts you sent in or worst case that your package was refused.


")
")
")
")
")
")
")
")
 (2)")

